Equipment Needed
- Food Processor or Zip-Top Bag and Rolling Pin
- Large Mixing Bowl
- Hand Mixer or sturdy spatula
- Baking Sheet
- Parchment Paper or Silicone Baking Mat
- Two Forks or a Chocolate Dipping Tool
- Microwave-Safe Bowl or Double Boiler
Step-by-Step Instructions
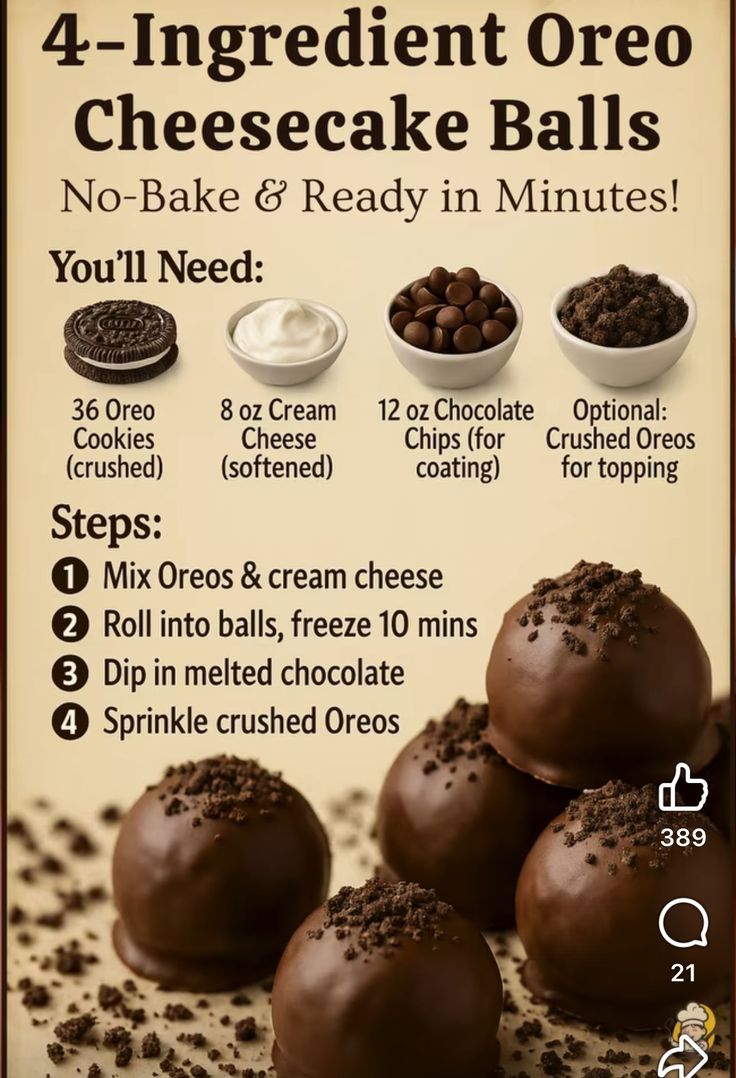
My first step is always the most satisfying: turning those Oreos into fine crumbs. I use my food processor because it’s fast and creates the perfect, even texture you need. If you don’t have one, a zip-top bag and a rolling pin work wonderfully—just channel any stress into crushing them! You want them to resemble dark sand. Then, in my large bowl, I add the utterly softened cream cheese. This is where I use my hand mixer on low. I gently beat the cream cheese for just 15 seconds to make it extra pliable before dumping in all those glorious crumbs. Mixing it by hand is possible, but the mixer gives you a perfectly uniform, dark dough in under a minute.
Now, for the rolling. I line a baking sheet with parchment paper—this is non-negotiable for easy cleanup. Using a small cookie scoop or a tablespoon, I portion the mixture. This stuff is sticky, so I lightly dampen my hands with water. Rolling them into neat, one-inch balls is oddly therapeutic. A pro-tip I learned the hard way: if the mixture feels too soft to handle, pop the whole bowl in the fridge for 15 minutes. Once all the balls are on the sheet, they go into the freezer for a solid 10 minutes. This chill time is crucial; it firms them up so they don’t fall apart during the chocolate bath.
The chocolate coating is where the magic happens and where I had my only minor kitchen disaster the first time. I melt my chocolate chips with that teaspoon of coconut oil in the microwave in 30-second bursts, stirring vigorously in between. Never microwave it for a full minute—trust me, I scorched a bowl once and had to start over. You want it smooth and glossy. Working with a few balls at a time from the freezer, I drop one in, use two forks to gently roll it, lift it, let the excess drip off, and then slide it back onto the parchment paper. If you’re adding a topping like extra crumbs, do it immediately before the chocolate sets.
The final, hardest step is the waiting. I let the chocolate set at room temperature if I can bear it, which takes about 30 minutes. If I’m in a rush, I’ll pop the whole tray back in the fridge for 10-15 minutes. The first time I made these, I was too eager and bit into one before the shell was fully firm. It was delicious, but messy! Letting them set completely gives you that perfect, crisp snap when you bite into the creamy, cool center. It’s worth the patience, I promise.(See the next page below to continue…)