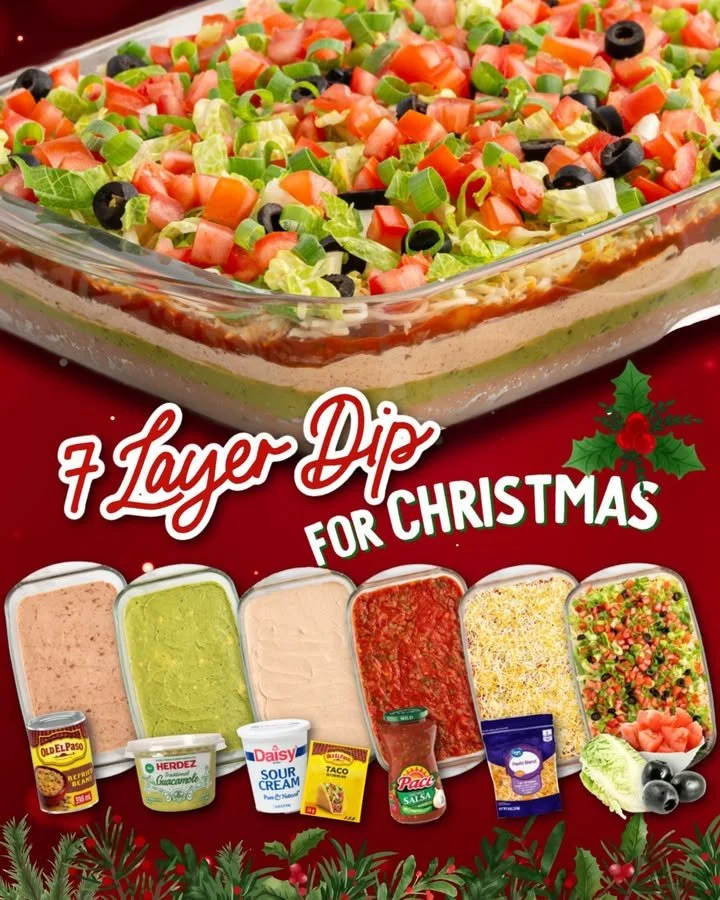
Next, I layer on the sour cream, gently dolloping it over the beans and smoothing it out to create an even layer. The creamy texture really complements the beans, making for a delightful contrast. After that, it’s guacamole time! I scoop my homemade or store-bought guacamole right on top, spreading it evenly over the sour cream. The vibrant green color is simply irresistible!
Following the guacamole, it’s salsa’s turn to shine. I pour it over the top layer and let it drip slightly into the avocado, pretending I’m an artist: my 7 Layer Dip is becoming quite the masterpiece! Now, I’ll garnish with shredded cheddar, which melts just slightly into the warm layers, and top it off with green onions and olives for a touch of color and flavor you’ll truly enjoy.
To finish off my dip, I let it chill in the refrigerator for about 20-30 minutes. This step is crucial as it lets all the flavors meld together beautifully. Just before serving, I usually add a few extra green onions on top for presentation. It’s so comforting to bring out this dish and watch everyone’s faces light up with excitement!
Pro Tips for Best Results
I tested this three ways to find the perfect balance of flavors. One of my favorite tips is to add a squeeze of fresh lime juice over the guacamole layer. It enhances the freshness and adds a pop of acidity that helps the flavors to shine!
I’ve also found that using high-quality salsa really makes a difference. When I’ve used homemade salsa, it takes my dip to another level. If you’re short on time, buy a good-quality brand and try to find one that’s chunky for added texture; it really enhances the overall experience.
Lastly, make sure to use a clear serving dish if possible. Trust me, the vibrant layers of beans, guacamole, salsa, cheese, and green onions are not just delicious—they’re a feast for the eyes too! Keeping it eye-catching makes every dip feel special.
Common Mistakes to Avoid
I’ve made a few rookie mistakes when making 7 Layer Dip that I’d love to spare you from! One of the biggest ones is using warm ingredients. I remember once trying to layer everything warm right after cooking the beans, and it turned into a gooey mess. Make sure each layer has cooled before you pile on the next!
Another common mistake is skipping the taco seasoning. It adds a wonderful flavor to the beans; I once forgot it completely and regretted that decision. Just a packet does wonders in making sure your layers have distinct and tasty flavors.
Also, be careful not to overfill your dish. I get a bit overenthusiastic sometimes, but after layering, I learned the hard way that there’s only so much dip you can fit before it spills over! It’s best to carefully gauge how much each layer needs to avoid a messy situation later.
Serving Suggestions
I love to serve my 7 Layer Dip with a bunch of crispy tortilla chips. The crunch of the chips paired with the creamy layers is such a satisfying combo! It’s the kind of snack that keeps you coming back for more, making it very easy to forget the time as everyone digs in.
If I’m feeling a bit fancy, I’ll add a side of fresh veggies like carrot sticks, cucumber slices, or bell pepper strips. It not only makes the table look appetizing but also allows for a healthier option for those who want it.
Don’t forget that this dip pairs wonderfully with a chilled drink. I love to serve it with soda, homemade lemonade, or even a nice margarita if it’s a special occasion. The refreshing drinks balanced with the rich flavors of the dip create a perfect party atmosphere!
Variations & Customizations
One of the great things about 7 Layer Dip is how easily it can be customized to fit your taste. For a spicier kick, I sometimes add diced jalapeños either mixed into the salsa or as a layer on top. It gives the dip an extra zing that keeps your taste buds on their toes!
If you’re catering to vegetarians, simply ensure that your refried beans are vegetarian, and you can even swap out the cheese for a dairy-free option that still delivers great taste. I’ve experimented with various types of cheese alternatives that melt quite nicely, and they add a unique flavor while remaining creamy.
Lastly, don’t feel confined to just the classic layers! Some of my friends have added corn, diced red peppers, or even fresh cilantro for an herby twist. There’s no limit to how you can make this dip your own, and I encourage you to get creative!
How to Store, Freeze & Reheat
If you happen to have leftovers (though that’s rare!), I recommend storing them in an airtight container in the refrigerator. It stays fresh for about 2-3 days, though I’ve noticed the sour cream and guacamole can brown a tad after a day, which is why I usually try to finish it off quickly!
Freezing 7 Layer Dip isn’t recommended because the texture of the ingredients changes once thawed. The creamy layers don’t hold up well, and it doesn’t quite taste the same after freezing. However, you can prepare each layer separately and freeze them for later use, then assemble fresh when you’re ready to serve!
When it comes to reheating, you really don’t need to. It’s a dip best enjoyed chilled, as all the flavors mix together beautifully in the cold! But if you do want to serve warm, just warm up the beans, reassemble, and quickly layer everything again for a cozy alternative.
Conclusion
In closing, I hope this 7 Layer Dip inspires you as much as it has inspired fun gatherings in my home. It’s such an easy dish that not only tastes fantastic but also brings people together. The joy of watching friends and family enjoy something I created fills my heart with warmth. I can’t wait for you to make it and see how much your loved ones will cherish it too! Happy dipping!