Next, it’s time to add the dry ingredients. In a separate bowl, whisk together the flour, baking soda, and salt. Slowly incorporate this mixture into the butter and sugar mixture until it forms a soft dough. The key here is to not overmix, as that can lead to tough cookies. Once your dough is ready, fold in the chocolate chips, and make sure they are evenly distributed throughout the dough.
Line your baking sheet with parchment paper for easy cleanup, then scoop tablespoon-sized balls of dough onto the sheet, spacing them a couple of inches apart. Bake in the preheated oven for 6 to 7 minutes, just until the edges are golden, and the centers appear soft. They might look underbaked, but that’s perfect because they’ll continue to cook slightly on the baking sheet while they cool. As I watch them bake, the excitement builds with every passing minute!
Pro Tips for Best Results
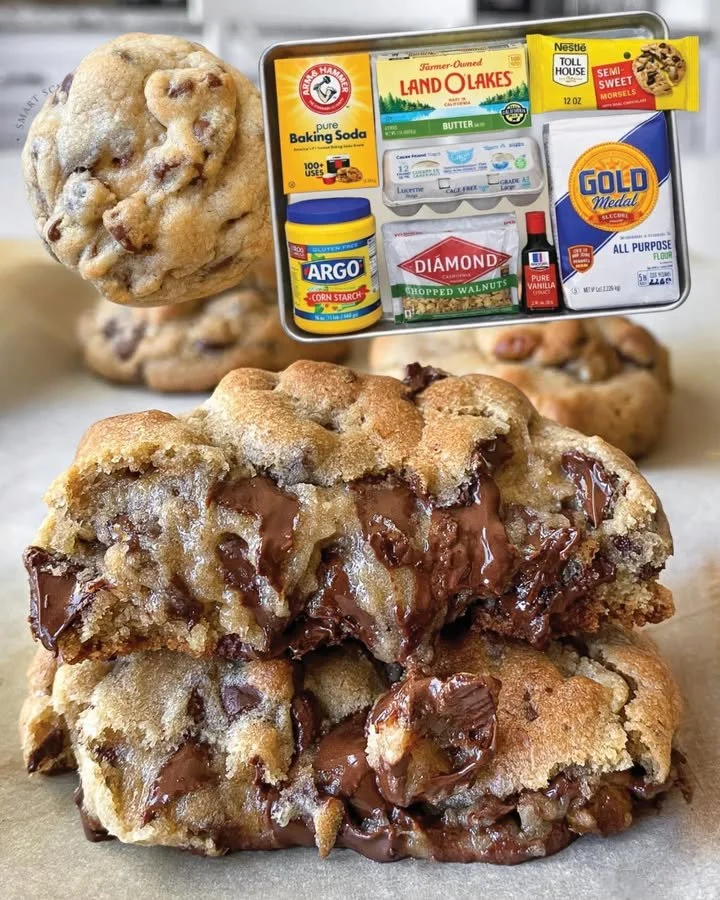
I tested this recipe three ways: with different types of chocolate chips, varying the baking time, and even trying it with gluten-free flour. My favorite is definitely using a mix of semi-sweet and dark chocolate chips for that richness and complexity. It adds a wonderful depth of flavor that compliments the dough beautifully.
You might be tempted to skip the parchment paper, but trust me, using it makes a real difference in how easily the cookies lift off the tray. I once forgot to line my sheet and ended up with a delicious mess that stuck stubbornly to the pan! Just a simple layer of parchment makes it all so much easier.
Finally, don’t crowd the baking sheet! I’ve learned the hard way that this leads to cookies merging into one giant, delicious blob. Give each cookie some space to expand, so they bake evenly and maintain their lovely round shapes.
Common Mistakes to Avoid
One common mistake is mixing the dough too long after adding the flour. I’ve made this error before—overmixing can result in cookies that are tough and chewy instead of soft and tender. My tip is to mix until just combined, so you get that lovely texture everyone loves. **(See the next page below to continue…)**
Another mistake I’ve encountered is underestimating the importance of cooling time. While I know it’s tough to resist the warm cookies fresh out of the oven, letting them set on the baking sheet for a few minutes is essential. They’ll firm up nicely and make for an even more satisfying bite. My patience has been rewarded more times than I can count!
Lastly, be sure to measure your ingredients accurately. I once had a batch turn out too salty because I didn’t level off my baking soda properly. Using a set of measuring spoons and cups ensures that each ingredient contributes its intended flavor and texture.
Serving Suggestions
These 7-minute Chocolate Chip Cookies are delightful on their own, but I love to serve them warm with a scoop of vanilla ice cream on top for an indulgent dessert. There’s something magical about the warm cookies melting the ice cream just a little bit—pure bliss!
For an afternoon snack, pairing them with a glass of cold milk is a classic choice. The smoothness of the milk beautifully balances the sweetness of the cookies, creating a nostalgic moment that takes me back to my childhood.
If I’m hosting friends, I might even arrange a fun cookie platter with some of my other favorite treats—brownies, meringues, and fruit slices. It’s a delightful way to offer a variety of indulgences while showing off my baking skills!
Variations & Customizations
One of the best things about cookie baking is that you can easily customize the flavors. For those who love nuts, I suggest folding in a cup of chopped walnuts or pecans—just make sure to reduce the chocolate chips slightly to maintain balance. The crunch adds a beautiful texture and takes these cookies to the next level.
If you’re feeling adventurous, try adding a pinch of espresso powder for a hint of coffee flavor that complements the chocolate superbly. It’s a fantastic way to enhance the chocolate flavor without making it taste like coffee.
For a fun seasonal twist, consider mixing in some holiday-themed sprinkles or swapping out chocolate chips for seasonal candy like Halloween M&Ms or even crushed peppermint candies during the winter months for a festive touch!
How to Store, Freeze & Reheat
Once these delicious cookies have cooled, I like to store them in an airtight container at room temperature. They typically last about 3-4 days, but let’s be honest—these cookies rarely last that long in my home!
If you want to make a batch ahead of time, freezing the cookie dough works wonders. Just scoop the dough onto a baking sheet, freeze the dough balls until solid, and then transfer them to a freezer bag. When you’re ready for fresh cookies, simply bake them straight from the freezer; just add a minute or two to the baking time.
As for reheating, I often pop a cookie in the microwave for about 10-15 seconds. It comes out gooey and warm, just like it was fresh! Alternatively, you can bake them for a minute in a preheated oven if you prefer a crispy exterior.
Conclusion
Baking 7-minute Chocolate Chip Cookies has become a cherished activity in my kitchen, one that fills my home with laughter and love. Whether for a casual snack, a late-night treat, or a holiday gathering, you’ll find these cookies quickly become a favorite for family and friends alike. Embrace the joy of baking, and treat yourself and your loved ones to these sweet delights—you won’t regret it! Happy baking!