<h2>Introduction</h2>
I can’t tell you how delighted I am to share my recipe for Milky Donut Balls with you! These little bites of joy are soft, bouncy, and oh-so-delicious. It’s one of those recipes that makes my kitchen feel like a haven, with the warm aroma of frying dough wafting through the air and bringing back nostalgic memories of fairs and bakeries. Today, I want to take you through the steps of creating these fluffy donut balls that can warm the heart and tickle the taste buds.
<h2>Why You’ll Love This Recipe</h2>
There’s something magical about how these donut balls achieve that perfect balance of being airy yet satisfying. The hint of milk gives them a unique flavor that sets them apart from traditional donuts. Plus, they’re incredibly versatile – you can enjoy them as is, or dust them with powdered sugar or dip them in your favorite glaze! Trust me, they will be a hit whether you make them for breakfast, dessert, or just because you deserve a sweet treat. <strong>(See the ingredients in the next page below...)</strong><!--nextpage-->
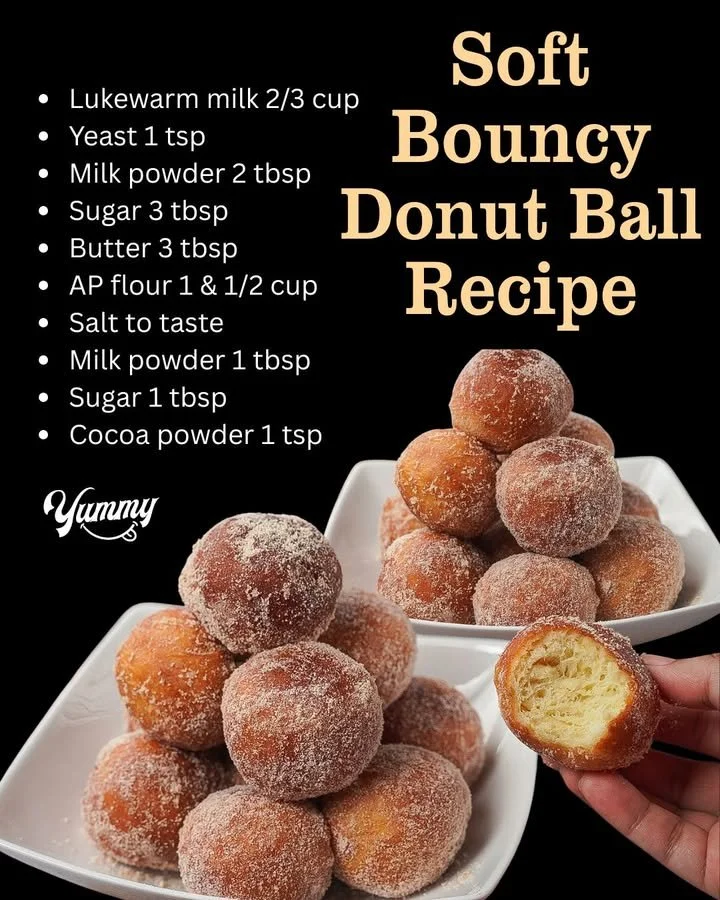
<h2>Ingredients</h2>
- 2 cups all-purpose flour
- 1/2 cup granulated sugar
- 1 tablespoon baking powder
- 1/2 teaspoon salt
- 1/2 cup milk
- 2 large eggs
- 1/4 cup unsalted butter, melted
- Oil for frying
- Powdered sugar or glaze (optional for topping)
<h2>Equipment Needed</h2>
- Mixing bowls
- Whisk
- Measuring cups and spoons
- Deep frying pan or pot
- Slotted spoon
- Cooling rack or paper towels
<h2>Step-by-Step Instructions</h2>
First, gather all your ingredients and equipment. In a large bowl, whisk together the flour, sugar, baking powder, and salt until well combined. In a separate bowl, mix the milk, eggs, and melted butter until smooth. Then, gradually add the wet ingredients into the dry mixture, stirring until just combined. The dough should be soft and a bit sticky, and it shouldn't take long to come together. <strong>(See the next page below to continue steps...)</strong> <!--nextpage-->
Next, heat your oil in a deep frying pan over medium heat. You’ll want to make sure the oil is hot enough to create bubbles when you drop a small amount of dough in – around 350°F (175°C). While waiting for the oil to heat, I like to prepare my workspace by laying out a cooling rack lined with paper towels to drain any excess oil after frying.
Once the oil is ready, use a spoon or your hands to form small balls of dough, about the size of a golf ball, and carefully drop them into the hot oil. Don’t overcrowd the pan; I usually fry about three or four at a time to ensure they cook evenly. Fry them for about 3-4 minutes on each side, or until they turn a beautiful golden brown.
As they fry, your kitchen will smell delightful! When perfectly golden, transfer the donut balls to the cooling rack, allowing them to breathe and cool slightly. If you’re feeling extra indulgent (who isn’t?), now’s the time to sprinkle them with powdered sugar or dip them in a glaze for an added touch of sweetness.
<h2>Pro Tips for Best Results</h2>
I tested this three ways to see how different forms of flour affect the texture. What I found was that all-purpose flour gave the best balance of softness and structure. If you’re looking for something a bit healthier, you could try substituting a portion of the all-purpose flour with whole wheat – just don't go too heavy on it, or they might come out denser!
For the frying, patience is key! I initially rushed the oil heating process, which resulted in unevenly cooked donut balls. Taking the time to let the oil reach the right temperature makes all the difference, ensuring a crispy exterior and a light, fluffy interior.
Lastly, I’ve learned to keep an eye on them while they’re frying. They can go from perfectly golden to burnt in a matter of seconds! I always find myself peeking in the pan, fascinated by the transformation but careful not to let them overcook.
<h2>Common Mistakes to Avoid</h2>
One mistake I made on my first attempt was to test the oil with too much dough. It resulted in a temperature drop, and the donut balls turned out greasy instead of fluffy. Always be sure to test the oil with a small dollop of dough first; that way, you’ll know exactly when to add more!
Another thing I found is that patience is crucial not just in frying, but in letting the dough rest before frying. Trust me, a quick ten-minute rest helps develop the dough's flavor and makes the balls even fluffier when cooked. Don’t skip this step thinking you can get to the good part faster!
Overcrowding the frying pan is another common hiccup. I once tried making a large batch at once, and they ended up clumping together – a real mess! To avoid this, fry in small batches so each donut ball has room to float around and cook evenly. <strong>(See the next page below to continue...)</strong><!--nextpage-->
Finally, I’ve had my fair share of glaze disasters. If you're going for a glaze, make sure to let the donut balls cool slightly before dipping them. A too-warm donut ball can melt your glaze, resulting in a sugary puddle instead of a delightful, shiny coating.
<h2>Serving Suggestions</h2>
I love serving my Milky Donut Balls with a side of fresh fruit or a scoop of vanilla ice cream for an extra treat! The contrast of warm, fluffy donuts with cool, creamy ice cream is simply divine. Plus, it adds a delightful color pop to the plate.
You can also get creative with toppings! I sometimes love to drizzle melted chocolate over the top or sprinkle on some cinnamon sugar for a cozy cinnamon kick. The possibilities are endless!
If you’re looking for something more festive, consider serving these donut balls at a gathering with various dips and toppings. Set out a fun DIY station where guests can roll their donut balls in powdered sugar, coconut flakes, or even crushed nuts. It can be a fun way to share moments and flavors with family and friends!
<h2>Variations & Customizations</h2>
One of my favorite variations is to infuse the dough with flavors. I’ve added vanilla extract or almond extract to the wet ingredients for a different twist. Sometimes, I even throw in some lemon or orange zest for a bright, fresh flavor. You can really customize this recipe to match your mood or the season!
If chocolate is your thing, you can easily add cocoa powder to the flour mixture for chocolate donut balls. I’ve found that about 1/4 cup of cocoa powder does the trick without compromising the texture. They are chocolatey and satisfying—perfect for chocolate lovers!
For a cozy fall treat, consider adding cinnamon and nutmeg to the dough. Just a teaspoon of each can turn these donut balls into a seasonal favorite. These aromatic spices bring warmth and a dash of cheer to your kitchen.
<h2>How to Store, Freeze & Reheat</h2>
If you have any leftover Milky Donut Balls (which I find hard to believe since they disappear so quickly!), you can store them in an airtight container at room temperature for a couple of days. They’re best enjoyed fresh, but I understand the temptation to save a few for later!
To freeze them, I recommend placing the cooled donut balls in a single layer on a baking sheet and freezing them for about an hour. Once they’re frozen, transfer them to a freezer bag. This method prevents them from sticking together, making it easy to take out a few at a time whenever you’re craving them.
When you’re ready to enjoy them again, reheat in the oven at 350°F (175°C) for about 5-7 minutes. Alternatively, you can pop them in the microwave for a quick warm-up, but be careful not to overdo it or they might become chewy instead of soft and bouncy!
<h2>Conclusion</h2>
I hope you enjoy making these Milky Donut Balls as much as I do! There’s something truly comforting about creating and sharing delicious treats with loved ones. Whether they’re for a special occasion or just a regular day, these donut balls are bound to bring smiles and satisfy your sweet tooth. Happy frying, and may your kitchen be filled with joy!