Pro Tips for Best Results
Let the melted butter cool for just a minute after taking it out of the microwave before adding your peanut butter. If it’s too hot, it can actually start to “cook” the peanut butter and make the texture a bit grainy. I found a warm, not scorching, mixture blends into the creamiest, smoothest base. Also, when pressing the base layer, lay a piece of parchment paper on top of the dough before you press. This keeps your tools (or hands) from sticking and pulling everything up, ensuring a perfectly smooth surface for your chocolate.
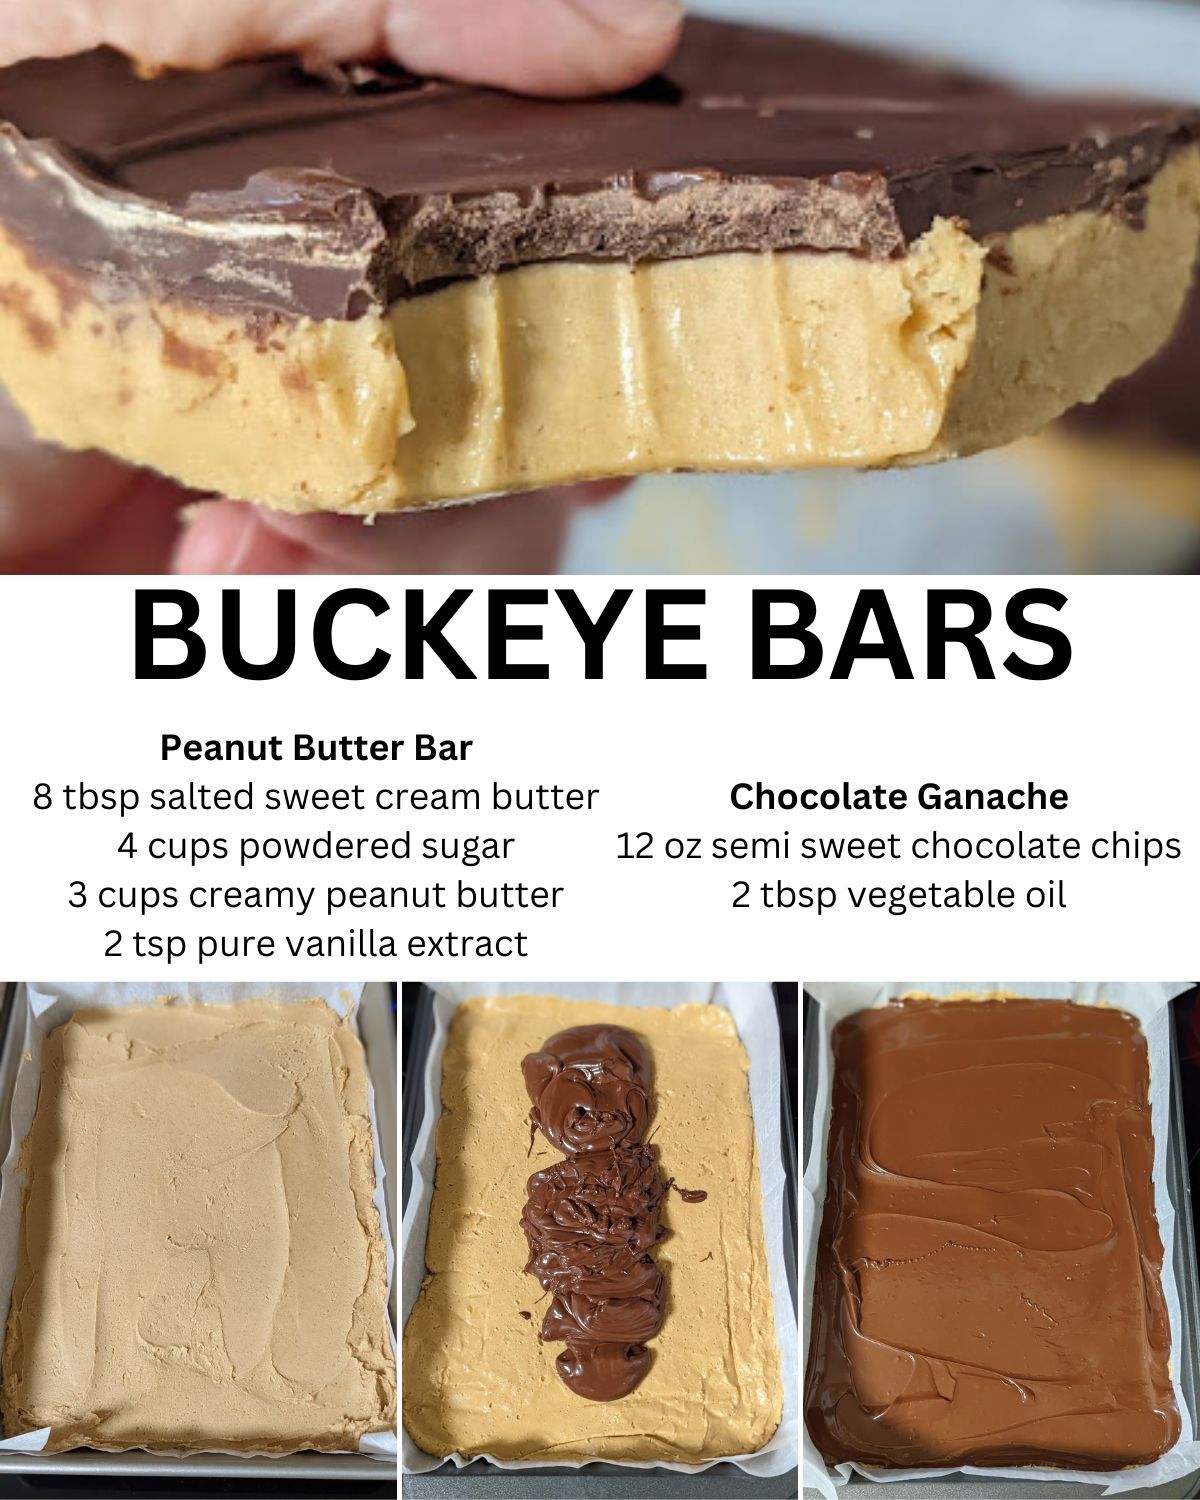
When melting the chocolate, resist the urge to crank up the microwave time. Chocolate holds its shape even when mostly melted, so it can look unmelted but be ready to burn. Short bursts and diligent stirring are the keys to a silky, lump-free ganache. If you see it’s almost melted but has a few stubborn chips, just keep stirring off the heat; the residual warmth will finish the job perfectly.
For the cleanest slices, score the chocolate layer lightly with your knife before it fully sets, about 10 minutes after you pour it. This gives the topping a guide to crack along when you do your final cut later. And always, always use a hot knife! I keep a tall glass of very hot water next to my cutting board, dip and dry my knife for every single cut. It glides through the firm chocolate and dense peanut butter like it’s nothing.
Common Mistakes to Avoid
The biggest mistake I made the first time was not mixing the base thoroughly enough. I left pockets of powdered sugar that didn’t get incorporated, and let me tell you, biting into a chalky, dry spot in an otherwise perfect bar is a real letdown. Take the time to mix, and don’t be afraid to get in there with your hands to ensure every bit of sugar is worked in. It should feel like a very stiff, moldable playdough.
Another pitfall is skimping on the chill time. I know it’s tempting to dig in, but if the chocolate hasn’t fully set, it will smudge and melt when you try to cut or pick up the bars, and the peanut butter layer will be too soft. This isn’t a suggestion—it’s a requirement for success. Set a timer, walk away, and let the refrigerator do its magic. Your patience will be rewarded with the perfect, firm texture.
Serving Suggestions
I love serving these bars straight from the fridge, cold and firm, on a simple platter. The contrast between the cool, creamy interior and the crisp chocolate shell is just divine. For a casual gathering, I’ll often just cut them into small, bite-sized squares and let people grab them as they pass by. They disappear shockingly fast, so I usually make a double batch if I’m having more than a few friends over.
For a more dressed-up dessert, I’ll plate a single larger bar with a tiny sprinkle of flaky sea salt and a few crushed, salted peanuts on top. It elevates the presentation and amplifies that salty-sweet dynamic that makes these so addictive. A small cup of strong, black coffee or a glass of cold milk is the absolute perfect pairing to balance the richness.
During the holidays, these become a staple on my cookie trays. They hold their shape beautifully at room temperature for a short while, so they transport well to parties. I always get asked for the recipe, and I love telling people how surprisingly simple they are to make. They have that “fancy bakery” look with a homestyle, easy process.
Variations & Customizations
Once you master the classic, it’s fun to play around! I’ve mixed a cup of crispy rice cereal into the peanut butter base for a delightful crunch, and my family adored the textural twist. You can also swap the semi-sweet chocolate for dark chocolate chips if you prefer a less sweet, more intense topping. I’ve done a half-and-half swirl of melted semi-sweet and white chocolate on top, which looks stunning and tastes amazing.
For a nutty twist, try using crunchy peanut butter instead of creamy, or stir in ½ cup of finely chopped toasted peanuts into the base layer. If you’re a fan of that salty kick, a light sprinkle of flaky sea salt over the wet chocolate ganache is a game-changer. I’ve even seen friends make a version with a layer of raspberry jam spread thinly over the peanut butter before adding the chocolate, creating a delicious PB&J bar.
If you need to make them gluten-free, you’re in luck—this recipe is naturally gluten-free as written, just be sure to check your labels. For a slightly different presentation, you can press the base into a square pan for thicker bars, or a larger jelly roll pan for thinner, more cookie-like slices. The core recipe is wonderfully adaptable.
How to Store, Freeze & Reheat
To store, I keep the bars in an airtight container in the refrigerator. They will stay perfectly fresh and maintain their ideal texture for up to a week. You can stack them with layers of parchment paper in between to prevent sticking. I don’t recommend leaving them out at room temperature for more than an hour or two, especially in a warm kitchen, as the chocolate can start to soften and lose its snap.
These bars freeze spectacularly well! I often make an extra batch for future cravings. I arrange the fully set and cut bars in a single layer on a parchment-lined baking sheet, freeze until solid (about 2 hours), then transfer them to a freezer bag or container. They’ll keep for up to 3 months. To serve, just let them thaw in the refrigerator for a few hours. There’s no need to reheat them—they are meant to be enjoyed cold.
Conclusion
These Buckeye Bars have become my go-to treat for potlucks, gift-giving, and satisfying my own serious peanut butter cravings. They’re a testament to how simple ingredients, when combined with a little care, can create something truly special and beloved by everyone who tries them. I hope this recipe brings as much joy to your kitchen as it has to mine. Now go raid your pantry, and get ready for the compliments to roll in