<h2>Introduction</h2>
When it comes to making simple but delightful treats in my kitchen, Butter Mints hold a special place in my heart (and stomach!). Not only are they incredibly easy to whip up, but they also come with that nostalgic flavor that reminds me of family gatherings and festive occasions. The creamy, melt-in-your-mouth texture combined with a hint of mint is simply irresistible.
<h2>Why You’ll Love This Recipe</h2>
I love how versatile Butter Mints are—they can be served at parties, special events, or just as a sweet indulgence for yourself. They’re a hit with both kids and adults alike! Plus, you only need a handful of ingredients that you probably already have on hand. And, they make great gifts when packaged nicely! Whether it’s for a wedding, baby shower, or holiday gathering, these little mints bring smiles all around. <strong>(See the ingredients in the next page below...)</strong>
<!--nextpage-->
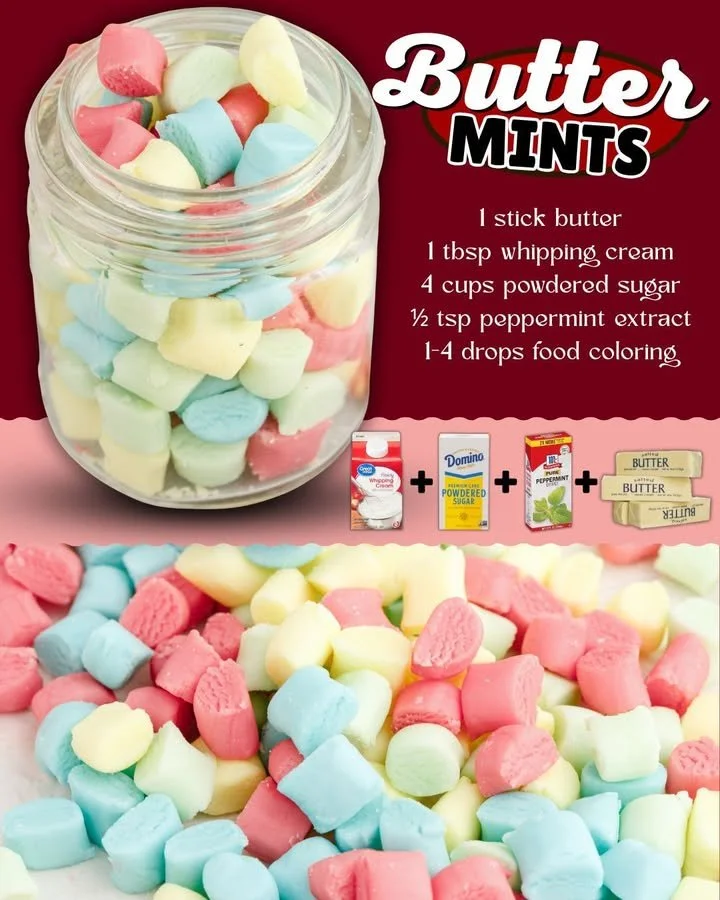
<h2>Ingredients</h2>
- 4 cups powdered sugar
- 1/4 cup unsalted butter, softened
- 2 tablespoons sweetened condensed milk
- 1 teaspoon peppermint extract (or flavor of your choice)
- A few drops of food coloring (optional)
<h2>Equipment Needed</h2>
- Mixing bowl
- Electric mixer or wooden spoon
- Baking sheet
- Parchment paper
- Small cookie cutter or shaping tool
<h2>Step-by-Step Instructions</h2>
The first step in my Butter Mint adventure is gathering all the ingredients together. I like to do this to ensure I have everything I need at arm's reach. In a mixing bowl, I start by creaming the softened butter until it’s light and fluffy. Then, I add in the sweetened condensed milk and peppermint extract. This mixture smells just divine, and the peppermint aroma fills the kitchen! After that, I slowly incorporate the powdered sugar until a dough-like consistency forms. It feels soft and pliable when you knead it with your hands. <strong>(See the next page below to continue steps...)</strong>
<!--nextpage-->
The fun part comes next! Once my dough is ready, I decide if I want to add food coloring. I usually split the dough into portions to make multiple colors—pink, green, and even blue when I’m feeling adventurous! I gently mix in the food coloring until I get the desired shade. Then, I roll out the dough on a floured surface to about a quarter of an inch thick. Using a small cookie cutter, I cut out cute little shapes, but you can easily just roll them into balls or squares if that's more your style.
After cutting out the shapes, I place them on a lined baking sheet to set. The dough needs a little time to firm up, which typically takes about 30 minutes to an hour. During this time, I make sure to clear my kitchen counters so that they can shine—both metaphorically and literally—while my Butter Mints are setting. Once they've firmed up, they’ll be ready for you to enjoy!
<h2>Pro Tips for Best Results</h2>
I tested this recipe three ways: with and without food coloring, and I even tried different flavor extracts! While I loved the classic mint flavor, using vanilla or almond extract adds a unique twist. For a fun variation, try mixing different extracts in one batch—just remember to balance them so one flavor doesn't overpower the others.
Another little trick I discovered is to dust your work surface with powdered sugar instead of flour when rolling out the dough. This keeps the mints sweet and avoids any unwanted flavors that flour might impart. It also makes for a lovely presentation!
Lastly, I recommend using fresh butter—something that is soft and creamy. I tried a batch with a slightly older butter I found in the back of the fridge, and let me tell you, the difference was night and day. Fresh ingredients always make for the best treat-making experience.
<h2>Common Mistakes to Avoid</h2>
First, don't skip the softening of the butter! If the butter is too cold, your mixture will be tougher, and it might not blend well with the powdered sugar. I learned this the hard way when my first batch turned out grainy instead of creamy.
Another mistake I've made in the past is rushing the setting time. If you don’t let the mints firm up, they can break apart easily while handling or packaging. Trust me, it’s worth the wait to enjoy a perfectly set Butter Mint. <strong>(See the next page below to continue...)</strong>
Also, be cautious with your peppermint extract; too much can be overpowering. I once mistakenly added an extra teaspoon—yikes! The resulting mints were just too intense. Stick to the recommended amount and taste as you go!
Finally, remember to store these mints in a cool place. If they're exposed to heat, they can get soft and lose their lovely texture. I once made the mistake of just leaving them out on the counter during summer—what a mess that was!
<!--nextpage-->
<h2>Serving Suggestions</h2>
Butter Mints are perfect for almost any occasion. I love serving them at holiday parties in a decorative bowl, where they can sparkle alongside other festive treats. They add a touch of whimsy to dessert tables and make for fun wedding favors too!
These mints are also lovely paired with tea or coffee. There’s something special about enjoying a few Butter Mints after a meal—like a sweet little breath of fresh air! I often keep a dish of them handy at dinner parties; they’re a charming touch that guests appreciate.
For a unique spin, try incorporating Butter Mints into your baking. I once added chopped Butter Mints to brownies, and the combination of chocolate and mint was simply magical! It’s a nice way to surprise friends and family with something a bit different.
<h2>Variations & Customizations</h2>
The base recipe for Butter Mints is quite forgiving, allowing you to get creative! For a fruity twist, consider substituting the peppermint extract for lemon or orange. I’ve enjoyed lemon mints during summer gatherings; they taste refreshing and bright!
Another fun option is to coat the mints in chocolate. Melting some chocolate and lightly dipping the mints adds a delightful richness and an elegant look. Just make sure to let them set on parchment once dipped!
Finally, consider experimenting with herbs! I once infuse fresh basil into the butter before incorporating it into the dough for a unique flavor. The hints of herbal notes made for an interesting, sophisticated mint that my friends loved trying!
<h2>How to Store, Freeze & Reheat</h2>
Storing Butter Mints is simple! I recommend keeping them in an airtight container in a cool, dry place. They can last up to two weeks if stored properly—trust me, they won't last that long in my house, though!
For longer storage, these mints freeze beautifully. I place them in a single layer on a baking sheet to freeze and then transfer them to a freezer-safe bag. They can stay good for up to three months. When you’re ready to enjoy them, just pop them in the fridge to defrost; they'll be as good as new!
Reheating is not necessary since they taste delightful cold, but if you want to revive those lovely flavors, let them sit at room temperature for a bit. This way, they’ll become soft and will melt in your mouth all over again!
<h2>Conclusion</h2>
I hope you feel inspired to make these lovely Butter Mints and share them with the ones you love. They embody a sense of joy that brings back fond memories whenever I whip up a batch. Enjoy the process, experiment with flavors, and make it your own! Happy mint-making!