Next, I sift together the flour, baking powder, and salt in a separate bowl. I slowly add this dry mixture to the cream cheese mixture. I love listening to the whisking sound as the dry ingredients incorporate smoothly into the creamy batter. Once I have a well-mixed dough, I scoop spoonfuls onto a lined baking sheet, leaving enough space between each cookie to allow for spreading. These cookies actually grow quite a bit, so trust me on this!
After all the cookie dough is on the sheet, I pop them into my preheated oven for about 12-15 minutes, keeping an eye out for that lovely golden color around the edges. My kitchen smells heavenly as they bake, mingling the flavors of vanilla and caramel in the air. Once they’re done baking, I remove them from the oven and let them cool on a wire rack. Meanwhile, I prepare my caramel sauce, warming it slightly so it’s ready for drizzling as soon as the cookies have cooled down a little.
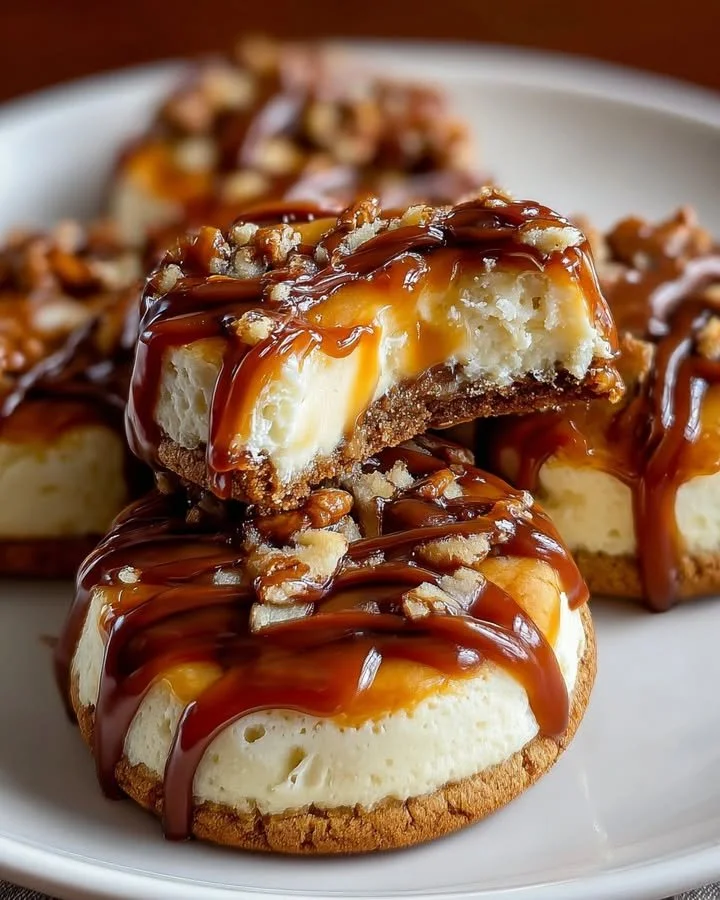
Once the cookies have cooled to room temperature, I generously drizzle the warm caramel sauce over the cookies. There’s something just so satisfying about watching that ooey-gooey caramel drip down the sides. For an added touch, I sprinkle a few flakes of sea salt on top. The combination of sweet and salty? Pure magic!
Pro Tips for Best Results
From my baking adventures, I’ve learned that using room temperature ingredients is key for achieving that perfect cookie texture. I always make sure to set my cream cheese and butter out a while before I even start prepping. This simple step makes a world of difference in how smoothly everything mixes together.
I also experimented with using different types of caramel sauces—both homemade and store-bought. While I love a good homemade caramel, I found that the store-bought version is a huge time-saver for busy days. However, if you have the time, making your caramel from scratch adds an extra layer of depth and flavor!
Lastly, I recommend letting the cookies cool completely before drizzling the caramel. I know it’s tempting to dive right in, but allowing them to cool helps the cookies stay intact and prevents the caramel from soaking in too much—it really keeps that perfect chewy texture!
Common Mistakes to Avoid
One mistake I made early on was overbaking these cookies. The key is to take them out of the oven when they’re just slightly underbaked in the middle; they’ll continue to cook a bit as they cool. Keep an eye on those edges—once they’re golden brown, it’s time to take them out! (See the next page below to continue…)
Another issue I encountered was making the dough too sticky. If you find your dough is difficult to scoop, just chill it in the refrigerator for about 30 minutes. This makes it much easier to handle without making a mess. It’s an easy fix that can save you a lot of frustration.
I also learned the hard way not to skimp on the caramel sauce. A generous drizzle is a must! If you find you have leftover caramel after dressing the cookies, store it in the fridge—it makes a fantastic addition to ice cream or pancakes!
Serving Suggestions
These Caramel Cheesecake Cookies are perfect for all occasions, whether it’s a cozy night in or a festive gathering. I love serving them warm with a scoop of vanilla ice cream on the side—there’s nothing quite like that combination! They also make for a beautiful dessert to bring to potlucks or parties; who wouldn’t be excited to bite into one of these luscious treats?
For a simple yet elegant presentation, I plate them on a wooden board, drizzled with extra caramel and topped with a sprinkle of sea salt. It’s such a hit with my friends and family. Plus, the dessert table looks splendid!
If I have leftovers (which is rare!), I love to pair them with a piping hot cup of coffee or a warm mug of cocoa for a cozy afternoon treat. It’s the little things that can elevate your day!
Variations & Customizations
If you want to give your Caramel Cheesecake Cookies a twist, try adding some chopped nuts. Pecans or walnuts would enhance the flavor beautifully and add a delightful crunch to the chewy cookie. You can also experiment by mixing in chocolate chips, if you’re feeling extra indulgent!
Another variation I often make is to switch up the caramel for a chocolate ganache drizzle. It gives the cookies a rich, decadent flavor and still pairs beautifully with the cream cheese base. I even enjoy topping them with diced strawberries for a fresh, fruity twist!
For the fall season, you could add spices like cinnamon or nutmeg to the dough for a warm, cozy flavor. Imagine biting into these drool-worthy cookies while curled up with a blanket on a chilly evening—pure bliss!
How to Store, Freeze & Reheat
To store my Caramel Cheesecake Cookies, I place them in an airtight container at room temperature for up to a week. They stay soft and chewy, just like the first day! If you want to keep them longer, they can last up to a month in the freezer.
When freezing, I recommend laying the cookies on a baking sheet to freeze individually before transferring them to an airtight container. This keeps them from sticking together and allows you to pull out just one or two at a time.
When I’m ready to enjoy them again, I like to let them thaw at room temperature for about 30 minutes. If I want to warm them up a bit, I pop them in the microwave for just 5-10 seconds. They taste as if they just came out of the oven again!
Conclusion
I hope you feel inspired to bring these Caramel Cheesecake Cookies into your kitchen! They’re a wonderful way to blend the classic tastes of cheesecake and caramel into a fun cookie form. Whether you’re baking for a special occasion or just treating yourself, I know these cookies will bring a smile to your face. Happy baking!