Now it’s time to form your cookie dough balls. Using a cookie scoop or a tablespoon, scoop out portions of the cookie dough and roll them into balls. Place them on a parchment-lined baking sheet and pop them in the freezer for about 30 minutes. This helps the dough balls firm up, making it easier to wrap them in brownie batter later on.
After the cookie dough has chilled, prepare your brownie mix according to the package instructions. Once it’s ready, grab your brownie batter and take it up a notch by wrapping each frozen cookie dough ball in brownie batter. You’ll want to ensure they’re completely coated, so don’t be shy! Bake them according to the brownie mix instructions, keeping an eye on them for that perfect fudgy texture.
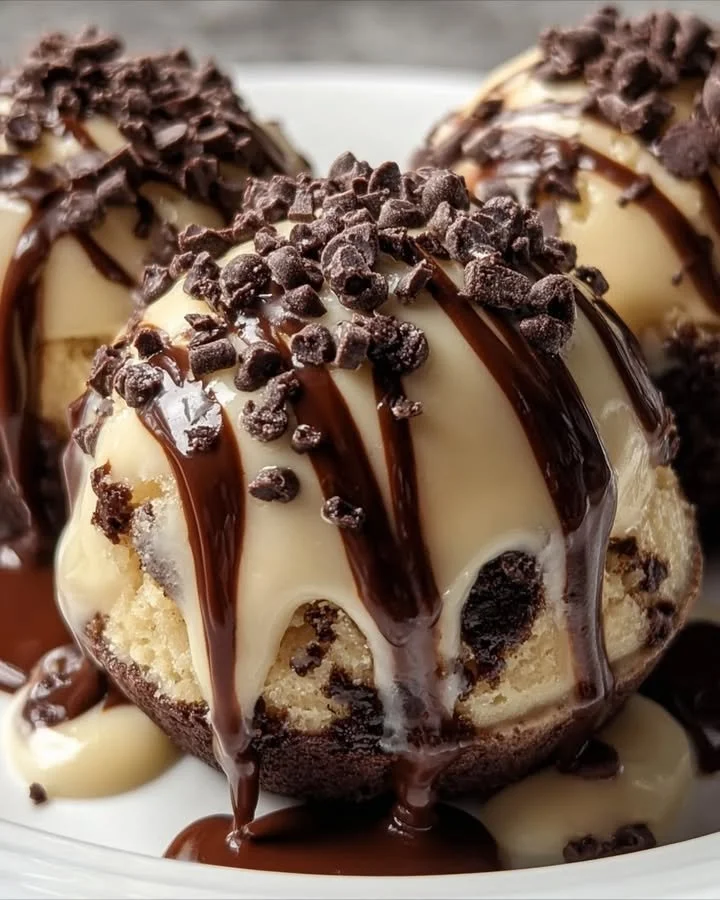
Once the brownie bombs are out of the oven and have cooled down, it’s time for the fun part: dipping them in chocolate! Melt your chocolate coating in a microwave-safe bowl and dip each brownie bomb until it’s fully coated. Let them cool on a wire rack, and if desired, sprinkle a hint of sea salt on top for that sweet-and-salty combination that will make your tastebuds dance!
Pro Tips for Best Results
I tested this recipe a few times, and one thing I learned is to use a good quality brownie mix. The better the mix, the fudgier the brownie bombs will turn out. It really elevates the final product! Also, don’t skip the chilling time for the cookie dough balls; it makes all the difference when you’re wrapping them in brownie batter—trust me, it prevents any disintegration in the oven.
Another tip I discovered is to use a combination of semi-sweet and dark chocolate chips in your cookie dough. This creates a depth of flavor that just makes the entire bite more satisfying. And hey, if you’re feeling adventurous, try adding some chopped nuts or coconut flakes for an extra texture twist!
Lastly, if you’re short on time or want to save some for later, keep your brownie bombs frozen. They can be made a few days in advance, and dipped in chocolate just before you’re ready to serve them. It’s a great time-saver when planning a party!
Common Mistakes to Avoid
But let’s talk about some common mistakes I found while making these delectable treats. First, make sure not to over-mix the brownie batter. This can lead to a denser brownie rather than the soft and gooey texture we all love. A light hand goes a long way when blending!
Another mistake I’ve made is using cookie dough that’s too warm or soft. If you skip chilling the dough, it won’t hold its shape when you wrap it in brownie batter, and you’ll end up with a messy situation in the oven. Your cookie dough balls should be firm and easy to handle to get that perfect bite.
I also learned the hard way that you shouldn’t wait too long to coat the brownie bombs in melted chocolate. If the brownie bombs cool down completely, the chocolate won’t stick well, and you’ll have a messy coating situation. Timing is key here, so work quickly when you’re dipping!
Lastly, don’t forget to let your dipped brownie bombs set completely before consuming. I know it’s tempting to dive right in, but patience will ensure that the chocolate coating has formed that delightful shell.
Serving Suggestions
When it comes to serving these beauties, I love to set them out on a beautiful platter, garnished with a sprinkling of sea salt for that touch of elegance. They also look great with some fresh berries on the side to add a burst of flavor and color.
If I’m feeling extra fancy, I might drizzle some extra melted chocolate on top or add a dusting of powdered sugar for a chic presentation. And for a more casual get-together, simply placing them in a cute cupcake liner can elevate their charm without a lot of fuss!
Pair these brownie bombs with a cold glass of milk or a scoop of vanilla ice cream, and you’ve got a dessert that is truly heavenly. They make for a great hit at birthday parties, potlucks, or just a treat for myself when I’m lounging on the couch.
Variations & Customizations
I always love to play around with flavors, so don’t hesitate to customize your brownie bombs. For a fun twist, how about swapping out chocolate chips for peanut butter chips or butterscotch chips? The options are endless and can really change the vibe of your dessert!
If you’re feeling seasonal, try adding pumpkin or cinnamon to your cookie dough base during fall. It’s a delightful way to celebrate the season and tastes incredible when paired with the fudgy brownie. You could even dip them in white chocolate instead of dark chocolate for a beautiful contrast and a lighter sweetness.
Finally, if you want to add some crunch, consider adding crushed Oreos or pretzels to the brownie batter. This little addition can make your brownie bombs not just fun to eat; they’ll have that impressive layered texture that everyone will rave about.
How to Store, Freeze & Reheat
These brownie bombs are perfect for making ahead of time. If you want to store them, simply place them in an airtight container at room temperature, and they’ll stay fresh for about three days—though I can’t guarantee they’ll last that long!
To freeze, arrange the dipped brownie bombs in a single layer in a freezer-friendly container, separating layers with parchment paper to prevent sticking. They can be stored for up to three months! When you’re ready to indulge, just thaw them in the refrigerator or at room temperature for a few hours.
Reheating isn’t necessary but if you’d like them warm, consider popping them in the microwave for 10-15 seconds. This will get the brownie soft again. Just be sure not to overdo it; you want to avoid a gooey mess!
Conclusion
And there you have it—Chocolate Chip Cookie Dough Brownie Bombs that are sure to impress your family and friends! I absolutely love making these, and every time I take that first bite, it reminds me of the little joys and cozy moments spent in the kitchen. Try this recipe out, and I bet it’ll become your new favorite as well. Happy baking!