Now, in a separate bowl, I whisk together the flour, baking powder, baking soda, and salt. Once that’s done, I alternate adding the dry ingredients and buttermilk to my butter mixture, starting and ending with the flour. It creates a wonderfully thick batter that’s just begging to be mixed in some chocolate chips! I gently fold in those chips, trying not to overmix to keep that tender texture in the cake. After dividing the batter between the two pans, I pop them in the oven and bake for about 25-30 minutes, or until a toothpick inserted in the center comes out clean.
Once the cakes are done, I let them cool in the pans for about 10 minutes before transferring them to a cooling rack. As they cool, I begin making the ganache. I heat the heavy cream in a small saucepan until it just begins to simmer, then pour it over the chopped semi-sweet chocolate in a bowl. I allow it to sit for a few minutes and then stir until it’s beautifully smooth. The smell is heavenly! I let the ganache cool until it thickens slightly before I start assembling the cake.
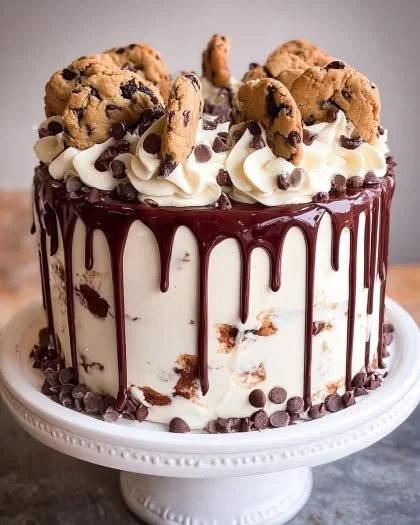
To assemble, I take one layer of cake and place it on my serving platter. I spread a layer of ganache on top, followed by crumbled cookies for that extra texture. Then, I gently place the second layer on top and cover the entire cake with a thin coat of ganache to create a crumb coat. After refrigerating it for about 30 minutes to set, I generously pour the remaining ganache over the top, letting it drip down the sides. If you’re feeling fancy, you can also decorate the top with more cookie crumbles and chocolate chips!
Pro Tips for Best Results
I tested this recipe three ways: using different types of cocoa powder, adding extra chocolate chips, and playing with baking times. I found that Dutch-processed cocoa adds a deep, rich flavor that pairs beautifully with the sweetness of the cake. If you’re a chocolate lover like me, feel free to up the chocolate chip ratio for even more gooey goodness!
Another pro tip is to ensure your ingredients are at room temperature before mixing. It really helps in achieving that light and fluffy texture. I often set out my eggs and buttermilk for at least half an hour before baking to avoid shocking the batter with cold ingredients.
Lastly, don’t skip the crumb coat! It’s a game-changer for a polished finish and makes decorating so much easier. Just a thin layer of ganache helps lock in those crumbs, so your final coat remains smooth.
Common Mistakes to Avoid
One common mistake I made was overmixing the batter, which led to a dense cake. I quickly learned that a few gentle folds are all you need once you add the flour mixture. It’s like a dance—you want it mixed, but still light! (See the next page below to continue…)
Another thing to watch out for is skipping the cooling time. I once tried to assemble the cake while it was still warm, and let me tell you, it was a gooey disaster! Allowing it to cool completely will create a much more stable structure and a better cake overall.
Also, don’t rush when making your ganache! If you heat the cream too much or skip the resting time with the chocolate, you might end up with a grainy texture instead of that luscious smooth finish you want.
Serving Suggestions
This Chocolate Chip Cookie Drip Cake is perfect for any gathering, whether it’s a birthday party or just a weekend treat at home. I love serving it with a scoop of vanilla ice cream on the side—the hot and cold combination is simply divine!
You can also pair it with a drizzle of caramel sauce for those who prefer that extra sweetness. Each slice can be a mini masterpiece with a sprinkle of sea salt on top to enhance the chocolate flavors. Trust me, your guests will be raving about it!
If you’re feeling creative, serve slices alongside fresh berries, like strawberries or raspberries. The tartness of the berries perfectly balances the sweetness of the cake.
Variations & Customizations
This cake is like a blank canvas that invites creativity! If you want to switch things up, try adding a peanut butter filling between the layers for a delightful surprise. The combination of chocolate and peanut butter is always a crowd-pleaser!
For a different flavor profile, consider substituting some of the all-purpose flour with almond flour for a nutty twist. This adds a unique texture that works wonderfully with the chocolate. Just be sure to adjust the quantities a bit since almond flour behaves differently.
Lastly, you can easily transform this into a semi-naked cake! Instead of pouring ganache over the top, just frost the outside lightly with buttercream and leave the sides exposed. It creates a rustic, charming look while allowing the beautiful chocolate layers to shine through!
How to Store, Freeze & Reheat
If you have leftovers (which is rare in my kitchen!), I recommend storing the cake in an airtight container in the fridge. It will stay fresh for about 3 to 4 days. Just reheat slices in the microwave for 10-15 seconds to restore that just-baked warmth.
For longer storage, you can freeze the cake! Wrap each layer individually in plastic wrap and then store them in an airtight container or freezer bag. It will last for up to 3 months. When you’re ready to enjoy again, let the layers defrost in the fridge overnight, and whip up some fresh ganache to make it special once more.
If you decide to freeze individual slices, just pop them in the microwave straight from the freezer for about 30 seconds and enjoy a quick chocolate fix!
Conclusion
Thank you for joining me on this delightful baking adventure! This Chocolate Chip Cookie Drip Cake is a treat that never fails to impress. I hope you enjoy making it as much as I do. Remember, each cake is an opportunity to get a little creative and sprinkle a bit of love into your kitchen. Happy baking!