Pro Tips for Best Results
My first test of this recipe taught me that apple size matters immensely. I initially chopped my apples into large chunks, thinking bigger was better. They sank to the bottom and created a soggy layer. Dicing them into small, ¼-inch pieces ensures they suspend perfectly throughout the batter and bake evenly. This small change made all the difference between a good bread and a great one.
Room temperature ingredients are your secret weapon here. I’ve made this with cold eggs and butter straight from the fridge, and the batter never emulsified properly—it looked curdled and didn’t rise as well. Taking the extra 30 minutes to let your eggs and butter sit on the counter guarantees a smooth, voluminous batter that bakes up with a perfect texture. It’s a simple step with a massive payoff.
For the ultimate flavor, let the bread cool almost completely before slicing. I know it’s torturous with that amazing smell in the air, but cutting into it while it’s piping hot can cause it to crumble and the swirls to bleed. Allowing it to set for a few hours (yes, hours!) lets the flavors meld and the crumb firm up, giving you those beautiful, clean slices that showcase every layer.
Common Mistakes to Avoid
One mistake I made the first time was not properly coating my apples in the cinnamon-sugar mixture. I just gently stirred them and poured them in. The sugar clumped and created uneven pockets. Don’t do what I did! Really take a minute to toss and coat every single apple piece thoroughly. This ensures the sugar melts into delicious caramel-y streaks around each bit of fruit, rather than staying in dry clumps.
Another easy pitfall is overmixing the batter after adding the flour. The moment you see the last streak of flour disappear, stop mixing. I’ve tested this both ways, and the batter mixed just until combined yields a tender, soft crumb. The batter you mix for another 30 seconds “to be sure” yields a tougher, more muffin-like texture. Resist the urge! A few tiny lumps are perfectly fine and actually desirable.
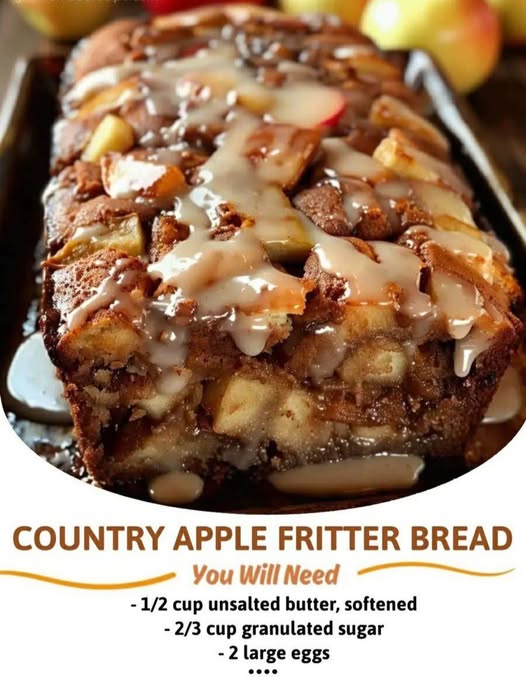
Serving Suggestions
I love serving this bread still slightly warm from the oven, about an hour after it’s baked. The warmth makes the cinnamon-sugar topping sparkle and the interior feel like the ultimate comfort food. A simple dusting of powdered sugar is my go-to for a pretty finish, but a plain slice is absolutely perfect on its own, paired with a hot cup of coffee or a cold glass of milk.
For a special brunch or when I’m feeling indulgent, I’ll toast a slice lightly in a skillet with a tiny pat of butter until the edges are crisp. Then, I’ll add a dollop of freshly whipped cream or a scoop of vanilla bean ice cream on the side. The contrast of the warm, spiced bread with the cold, creamy ice cream is nothing short of spectacular. It transforms the bread into a full-blown dessert.
If you’re bringing this to a gathering, I like to slice the entire loaf and arrange it on a platter. It’s a guaranteed crowd-pleaser that needs no accompaniment, though I sometimes set out a small bowl of salted caramel sauce for those who want to take it over the top. It always, without fail, disappears first from the table.
Variations & Customizations
I’ve played with this recipe a lot, and one of my favorite twists is adding a handful of chopped, toasted pecans or walnuts to the apple-cinnamon swirl. The nutty crunch adds a wonderful textural contrast to the soft apples and tender bread. Just fold about a half-cup into the apple mixture before layering. It gives it a fantastic autumn streusel-like quality.
For a richer, almost coffee-cake vibe, try adding a simple streusel topping instead of the cinnamon-sugar. Mix ¼ cup flour, ¼ cup brown sugar, two tablespoons of cold cubed butter, and a pinch of cinnamon until crumbly. Sprinkle it over the top before baking. The buttery, crispy crumb it creates is absolutely divine and makes the bread feel even more decadent.
If apples aren’t in season, I’ve had great success using ripe pears or even a combination of peaches and a handful of blueberries. The key is to use a fruit that holds its shape when baked. For a fun holiday version, I’ve added a quarter teaspoon of nutmeg and allspice to the cinnamon mix, which fills the kitchen with the most wonderful, spiced aroma.
How to Store, Freeze & Reheat
To keep this bread at its best, I let it cool completely, then wrap it tightly in plastic wrap or store it in an airtight container at room temperature. It stays wonderfully moist for 2-3 days this way. I do not recommend refrigerating it, as the fridge tends to dry out baked goods like this much faster. The texture is always best at room temp.
For longer storage, freezing is fantastic. I wrap the fully cooled loaf (or individual slices) first in plastic wrap, then in a layer of heavy-duty aluminum foil. It keeps perfectly for up to 3 months. To enjoy, I simply thaw it overnight on the counter. To recapture that “fresh from the oven” magic, I’ll warm a slice in the toaster oven or a 300°F oven for 5-10 minutes. It brings back the crispy top and makes the inside soft and warm again.
Conclusion
This Country Apple Fritter Bread is more than just a recipe to me; it’s a little jar of captured comfort. It’s the recipe I reach for when I want to fill my home with warmth and welcome, or when I simply need a sweet project that guarantees delicious results. I hope it brings as much joy to your kitchen as it has to mine. Now, go preheat that oven—your new favorite apple treat is waiting to be made. Happy baking