Pro Tips for Best Results
I tested this recipe three different ways: assembling it cold and baking right away, letting it sit assembled in the fridge for a few hours, and letting the glazed rolls sit at room temperature before baking. The winner, hands down, was that room-temperature rest after glazing. It gives the rolls time to drink up all that buttery goodness, leading to an unbelievably tender, cohesive final product. If you’re prepping ahead, assemble everything, cover, and refrigerate, but pull it out 30 minutes before you bake and add the glaze then.
Here’s what I learned the hard way about the bake: the foil is not optional. That first covered phase steams the sliders, heating everything through perfectly without over-browning the tops. If you skip it, the tops can get too dark and crusty before the cheese fully melts and the center is warm. The final uncovered bake is your chance to get that perfect color and crisp up the edges just slightly. Watch it closely—ovens vary, and you want that perfect amber hue.
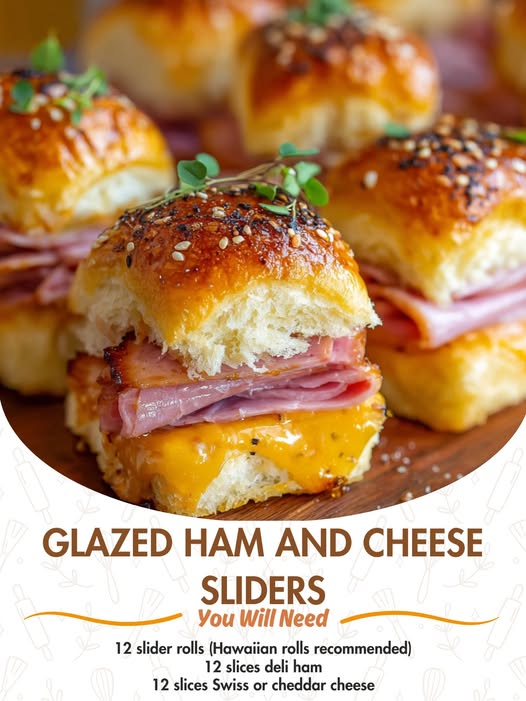
For the ultimate experience, use both cheeses. I started doing this after a happy accident. Layering a slice of sharp cheddar directly on the bottom bun, then the ham, then a slice of Swiss cheese creates a symphony of flavors. The cheddar provides a tangy punch, and the Swiss offers that iconic stretchy melt. It’s a small extra step that makes a noticeable difference in every bite. Trust me on this one.
Common Mistakes to Avoid
My biggest first-time mistake was using rolls that were too fresh. They were so soft they almost dissolved under the glaze. I’ve found that rolls that are a day old, or even slightly staler, hold up much better to the soaking process without turning to mush. If you only have fresh rolls, that’s okay—just reduce your pre-bake soaking time by a few minutes. Also, don’t separate the individual rolls before assembling. Cutting the whole block as one is the key to keeping all that cheesy, hammy filling neatly contained.
Another pitfall is going overboard with the ham. It might seem like more is better, but if you pile it too high, the sliders won’t press together, and you’ll end up with filling that slides out with every bite. Aim for one, maybe two folded slices per slider. The beauty of this dish is in the harmony of flavors—the sweet roll, the salty ham, the rich cheese, and the tangy glaze. Let each component shine without overwhelming the others.
Serving Suggestions
I love serving these sliders right in the baking dish, nestled amongst some vibrant sides to cut through the richness. A big, crisp garden salad with a sharp vinaigrette is my go-to. The acidity and freshness are the perfect counterpoint to the warm, savory sliders. For a casual gathering, I’ll set out a bowl of dill pickle spears and some spicy potato chips—the crunch factor is a must.
When I’m making this for a game-day spread, it becomes the centerpiece alongside other finger foods. Think crispy baked potato wedges with ranch for dipping, a tangy three-bean salad, or a cool and creamy coleslaw. The sliders are so satisfying that you don’t need to overcomplicate the menu. They pair wonderfully with a light beer or a sparkling cider.
For a cozy family dinner, I keep it simple. A warm tomato soup for dipping transforms the sliders into the ultimate comfort meal. It feels nostalgic and indulgent. Sometimes, I’ll just add a side of sweet potato fries or roasted broccoli. No matter how you serve them, have plenty of napkins on hand—these are gloriously messy in the best way possible.
Variations & Customizations
The beauty of this recipe is its canvas-like quality. I’ve played with so many variations! One of my favorites is the “Thanksgiving Leftovers” slider. Swap the ham for thinly sliced turkey, use Swiss cheese, and add a thin layer of whole-berry cranberry sauce on the bottom bun before assembling. The sweet-tart pop with the savory glaze is unforgettable. You could even sneak in a little stuffing if you’re feeling adventurous.
For a kick, try a “Spicy Southwest” version. Use smoked cheddar or pepper jack cheese, and add a layer of pickled jalapeños over the ham. You can even mix a teaspoon of sriracha into the glaze. Another crowd-pleaser is the “Reuben-Inspired” slider. Substitute corned beef for the ham, Swiss cheese, and add a thin spread of thousand island dressing and a bit of drained sauerkraut. The flavors meld together under the glaze just spectacularly.
Don’t be afraid to play with the glaze itself, either. A friend of mine adds a tablespoon of everything bagel seasoning instead of poppy seeds for a garlicky-oniony twist. If you’re out of Dijon, a good grainy mustard works wonderfully. For a deeper flavor, use half butter and half mayo in the glaze base—it sounds odd, but it creates an incredibly rich, almost brioche-like coating. The recipe is wonderfully forgiving.
How to Store, Freeze & Reheat
From my experience, these sliders are best enjoyed the day they’re made, but leftovers can be saved. Let them cool completely, then store them in an airtight container in the refrigerator for up to 2 days. To reheat, I strongly recommend using an air fryer or toaster oven at 325°F until warm and the cheese is melty again—this takes about 5-7 minutes and helps revive some of the texture. The microwave will work in a pinch, but it will steam them, making the rolls quite soft.
You can also freeze them before baking for a fantastic make-ahead meal. Assemble the sliders (without the glaze) in a freezer-safe dish, wrap it tightly in both plastic wrap and foil, and freeze for up to a month. When you’re ready, thaw it overnight in the fridge. Let it come to room temperature for 30 minutes, prepare your glaze, pour it over, and then bake as directed, adding a few extra minutes to the covered bake time if needed. I do not recommend freezing them after baking, as the rolls can become unpleasantly soggy upon thawing and reheating.
Conclusion
These Glazed Ham and Cheese Sliders are more than just a recipe; they’re a little parcel of joy, a guaranteed way to bring people together, and a testament to how simple ingredients can create something extraordinary. Every time I make them, I’m reminded of that first chaotic, successful Saturday, and the happy silence that falls over a room when everyone takes their first bite. I hope this recipe finds its way into your kitchen and becomes a cherished, frequently requested favorite in your home, too. Now, go preheat your oven—your new favorite snack awaits.