Common Mistakes to Avoid
The most common pitfall is impatience with the cooking stage. This isn’t a recipe you can walk away from. Standing and stirring continuously during the boil is mandatory. I made the mistake of answering the door once, and in that 60 seconds, the bottom layer scorched, imparting a bitter flavor throughout the whole batch. It was a total loss. Constant, attentive stirring is your insurance policy against burned sugar and wasted ingredients.
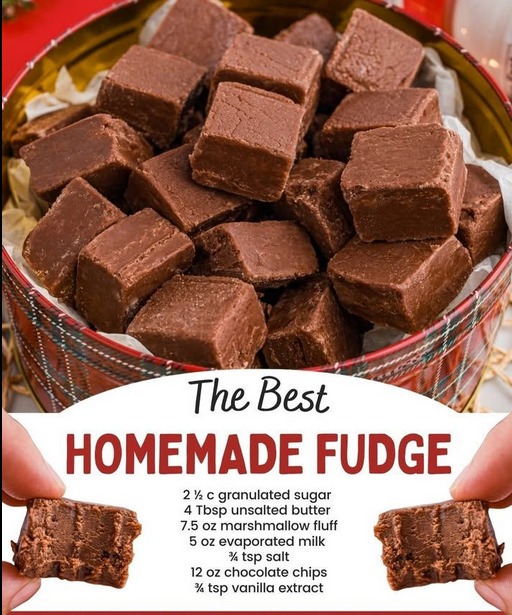
Another classic error is substituting ingredients haphazardly. I’ve seen recipes call for sweetened condensed milk instead of evaporated milk—they are not the same! Sweetened condensed milk is much thicker and sweeter and will throw the entire chemistry of the recipe off. Similarly, trying to use mini marshmallows instead of fluff doesn’t work the same way; they don’t melt down as smoothly. Stick to the listed ingredients for guaranteed success. Trust me, I’ve tried the shortcuts so you don’t have to.
Serving Suggestions
I love serving this fudge straight from the pan, cut into generous one-inch squares. It’s rich, so a small piece is deeply satisfying. For a truly decadent dessert plate, I’ll pair a square with a small scoop of vanilla bean ice cream and a drizzle of salted caramel sauce. The contrast of cold, creamy ice cream with the dense, room-temperature fudge is absolutely divine.
During the holidays, I turn this fudge into edible gifts. I arrange an assortment of squares in a festive tin, layering them between sheets of parchment. I’ve found that adding a few toasted pecan halves or a sprinkle of flaky sea salt on top of the fudge just after pouring it into the pan not only looks gorgeous but adds a wonderful textural and flavor contrast. It makes the gift feel extra special and handmade, which it is!
Variations & Customizations
Once you’ve mastered the classic, the fun really begins. My favorite variation is Rocky Road Fudge. Simply fold in 1 cup of mini marshmallows and ¾ cup of chopped toasted walnuts right after you’ve stirred in the chocolate, just before pouring it into the pan. The marshmallows get a little melty and the nuts add a fantastic crunch. It’s like a candy bar in fudge form.
For a festive twist, try stirring in ½ cup of crushed peppermint candies at the end for a chocolate-peppermint version—it’s incredible around Christmastime. You can also swap the chocolate chips for peanut butter chips for a totally different profile, or do a half-and-half swirl. A friend of mine adds a teaspoon of instant espresso powder to the syrup to deepen the chocolate flavor without making it taste like coffee. The possibilities are endless, so don’t be afraid to make it your own!
How to Store, Freeze & Reheat
Storing this fudge is a breeze. Once fully set, I keep it in an airtight container at room temperature, with parchment between layers. It stays perfectly soft and delicious for up to two weeks. I don’t recommend refrigerating it, as it can cause the sugar to “sweat” and the texture to become oddly firm. Room temperature is where it shines.
Yes, you can freeze this fudge! I wrap the whole block or individual pieces tightly in plastic wrap, then place them in a freezer bag. It keeps for up to 3 months. To thaw, simply let it sit, still wrapped, on the counter for a few hours. This prevents condensation from making the surface sticky. I’ve never needed to reheat it, as thawing brings it right back to its glorious, creamy state. It’s a fantastic trick for getting a head start on holiday baking.
FAQ Section
Can I double this recipe?
I wouldn’t recommend it for beginners. Candy making relies on precise temperature control, and doubling the volume means it will take significantly longer for the syrup to come to temperature, which increases the risk of overcooking or scorching. It’s better to make two separate batches. I tried doubling it once and the center never reached the proper temp while the edges were already overdone.
Why is my fudge grainy or sugary?
This almost always means the sugar crystallized. This can happen if you stirred too vigorously after the mixture started boiling, if a sugar crystal got into the mix from the side of the pan, or if you didn’t dissolve the sugar completely at the beginning. Next time, ensure your spoon and pan are clean, stir gently but constantly just until boiling begins, and use the wet pastry brush trick on the pot sides.
My fudge didn’t set. What went wrong?
A too-soft fudge means the syrup didn’t reach a high enough temperature (the soft-ball stage). This could be due to an inaccurate thermometer, not achieving a full rolling boil, or pulling it off the heat too early. Make sure your thermometer is calibrated and wait patiently for that 234°F-240°F range. If it’s too late and your fudge is still soup, you can actually re-cook it. Scrape it back into the pan, add a little extra milk, and bring it back to temperature.
Conclusion
There you have it—my absolute favorite homemade fudge recipe, shared with all the tips and hard-earned lessons from my own kitchen. This isn’t just a recipe; it’s a little ritual of patience and reward that fills your home with the most incredible scent and yields a treat that feels like pure love. I hope you give it a try and experience that moment of pride when you cut into a perfect, creamy square. Share it with friends, gift it to neighbors, or just keep it all for yourself—you’ve earned it. Happy cooking