Once the cherry mixture has cooled, preheat your oven to 375°F (190°C) and line your baking sheet with parchment paper. Next, roll out the pie crust on a floured surface to about 1/8 inch thick. Use a round cutter (or a glass) to cut out circles, about 4-5 inches in diameter. Place half of the circles on the prepared baking sheet and spoon a generous tablespoon of cherry filling onto each. Be careful not to overfill; otherwise, they might spill over while baking!
Now, take the remaining circles and place them over the cherry-filled ones. Pinch the edges to seal, creating little pockets of joy. I love using a fork to crimp the edges for a decorative touch! Brush the tops with a little beaten egg for that golden color finish, and if you’re feeling extra fancy, you can make small slits on top for venting and decoration. Bake them in the preheated oven for about 20-25 minutes or until they are golden brown and that lovely cherry aroma wafts through the air.
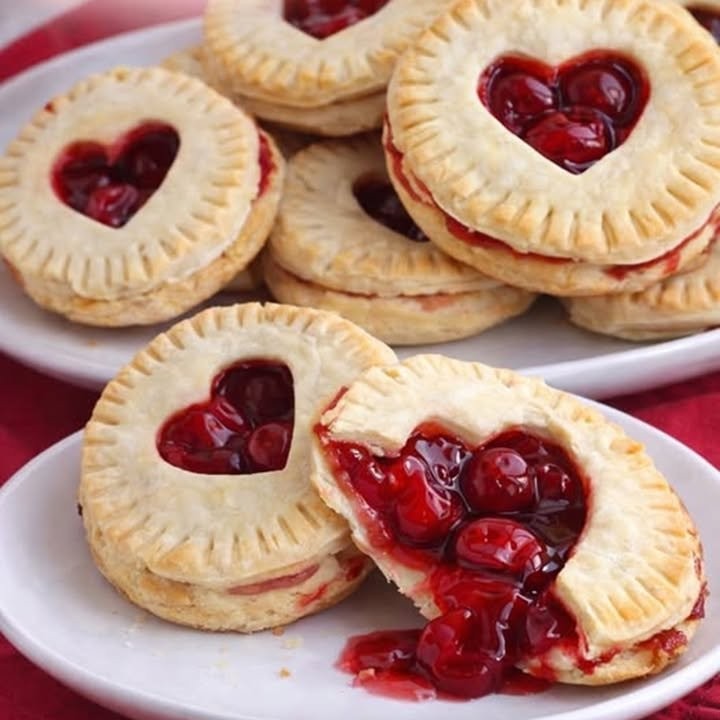
Finally, let these charming little pies cool for a few minutes before dusting them with powdered sugar, if desired. Each bite is a delightful combination of flaky crust and sweet cherry goodness that melts in your mouth. If you’re anything like me, you’ll find it hard to stop at just one!
Pro Tips for Best Results
One of the best pieces of advice I can share is to use fresh cherries whenever possible. They provide the best flavor and texture. I tested this recipe with frozen cherries too, and while they were still delicious, the fresh ones definitely took the cake! You might want to adjust sugar levels based on the tartness of the cherries you choose; a sweeter cherry might need less sugar, and conversely, a more tart variety could require a touch more.
I also experimented with different crusts. While a pre-made pie crust saves time (and is pretty darn good!), I found that a homemade crust adds an even deeper element of love and flavor. Trust me; it’s worth the extra step! Finally, don’t skip the egg wash; it truly makes all the difference in achieving that beautiful golden sheen.
Lastly, I love sprinkling a bit of cinnamon into my cherry filling for an added warm and cozy note. It complements the tartness beautifully and gives your guests a little flavor surprise when they take that first bite!
Common Mistakes to Avoid
One common mistake I made during my first attempts was not letting the cherry filling cool down. If you fill the pies with hot filling, the steam can cause the crust to become soggy, ruining that ideal flaky texture we all crave. It’s always best to let it sit until it reaches room temperature.
Another pitfall I encountered was overfilling the pies. I was so eager to make them burst with cherry goodness that I ended up with a mess in my oven! Remember, a tablespoon is all you need. These pies will still be juicy and flavorful without spilling out everywhere.
I also underestimated the oven temperature. Each oven is unique, so you may need to keep an eye on the baking time. If you see them browning too quickly, you can loosely cover them with aluminum foil for the last few minutes to ensure perfect doneness. Trust me; a burnt pie is not a happy pie!
Finally, don’t skip the vent holes on top if you choose to make a closed pie design! This step is crucial to let steam escape and prevent the filling from oozing out. A well-ventilated pie is a happy pie, and we want all our cherry goodness safely contained.
Serving Suggestions
These cherry pies can be served warm or at room temperature, but my favorite way is to enjoy them fresh from the oven with a scoop of vanilla ice cream on the side. The warm cherry filling paired with cold ice cream creates a heavenly combination. Plus, the visual of the melty ice cream contrasting against the colorful pie is pure bliss!
For a more festive touch, I love drizzling a bit of melted chocolate on top right before serving. It adds a nice rich flavor that pairs surprisingly well with the tartness of the cherries. If you’re feeling particularly indulgent, try a dollop of freshly whipped cream to top it off!
Lastly, these little pies also make fantastic gifts. Place them in a cute box or tie them with a ribbon, and you have a perfect homemade gift for friends and loved ones. Nothing says "I care" like something warm and delicious made right from your heart (and kitchen!).
Variations & Customizations
If cherry isn’t your thing, you can easily customize this recipe! A blackberry, raspberry, or a mixed berry pie works beautifully and can provide a different twist on the classic. I’ve made peach and blueberry versions during summer, which were equally delightful. Just be sure to adjust the sugar levels according to the natural sweetness of the fruit you use.
Another fun spin is to add flavorings to the filling, such as almond extract or a hint of bourbon. I tried a bourbon-spiked filling once, and it added a depth that took the pies to the next level. I recommend starting with just 1/2 teaspoon of bourbon and adjusting according to your taste.
Finally, for a crunchier texture, consider adding a crumb topping instead of a full top crust. Simply mix flour, brown sugar, and butter until crumbly and sprinkle it on top of the filling before baking. The result is a delightful cherry crumb pie that feels like a treat from your favorite bakery!
How to Store, Freeze & Reheat
If you have any leftover pies (which is unlikely, but still!), you can store them in an airtight container in the refrigerator for up to three days. Just reheat them in the oven at 350°F (175°C) for about 10-15 minutes to regain their flakiness before serving.
These cherry pies also freeze beautifully! If you want to make them ahead of time, just wrap individual pies in plastic wrap and place them in a freezer-safe bag. They can be frozen for up to three months. When you’re ready to enjoy, bake them directly from frozen, adding an extra 5-10 minutes to the baking time.
I love to enjoy a quick cherry pie on those busy weeknights when I need a little pick-me-up. Just heat them and serve, easy-peasy! The comforting aroma will fill your home with warmth and joy—just like a hug from your favorite person.
Conclusion
There you have it—my recipe for Incredible Valentine’s Day Cherry Pies! I can’t wait for you to try this delightful sweet treat in your own kitchen. Whether you share them with loved ones or savor them all for yourself, I promise they’ll make your Valentine’s Day a little extra special. Happy baking!