Next, I grab a clean mixing bowl and add the softened cream cheese. Using an electric mixer, I whip it until it becomes fluffy and light. Then, I gradually sift in the powdered sugar and pour in the vanilla extract, continuing to beat until everything is well combined. The smell is absolutely divine! To add a light and airy texture, I gently fold in the whipped cream, which makes the filling even more decadent.
Now, it’s time for the blueberries. I rinse them under cold water and mix them with the lemon juice to bring out their natural sweetness. Once the crust has firmed up a bit, I scoop the cheesecake filling into each cup on top of the crust, followed by a generous spoonful of the blueberry mixture. I like to layer them for that lovely aesthetic. After that, I cover each cup with plastic wrap and let them chill in the fridge for at least a couple of hours—or even overnight, if I can resist them that long.
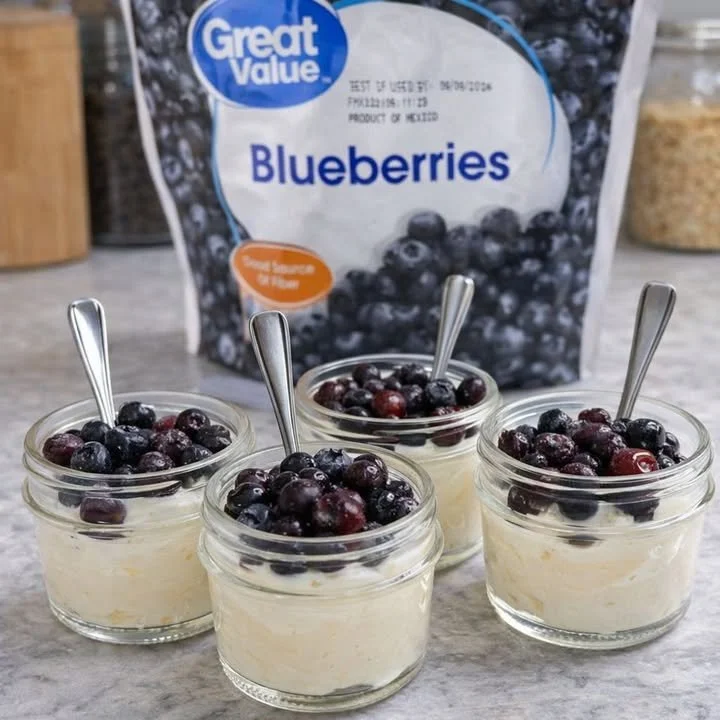
Finally, when I pull them out of the fridge, I can hardly wait to garnish each cup with a few extra blueberries on top. The final product is not just a treat for the taste buds; it’s also a feast for the eyes! The vibrant purples and creamy whites create such a stunning presentation, and all my friends are always so impressed when I serve them.
Pro Tips for Best Results
One thing I’ve learned from making these cheesecake cups is to let your cream cheese soften at room temperature before mixing it. This makes all the difference in achieving a creamy texture without lumps. I’ve tested it three ways: straight from the fridge, slightly warmed, and fully room temperature, and I can confidently say the latter is the winner!
Also, using a flavored whipped cream can add an unexpected twist. I once made these with vanilla bean whipped cream, and the tiny specks made it look so gourmet. It’s the little touches that elevate a simple dessert into something spectacular in my kitchen!
Lastly, don’t skip the chilling step! The longer you let them set, the firmer the cheesecake will become. Plus, it gives the flavors a chance to meld beautifully—a key point I learned the hard way after diving in too early.
Common Mistakes to Avoid
One mistake I made early on was adding too much butter to the crust. It can be tempting to pour in extra to ensure a rich flavor, but too much butter can result in a soggy crust that falls apart—definitely not what you want! Now, I stick to the recipe and have found it provides just the right balance of flavor and texture. (See the next page below to continue…)
Another thing I noticed? It’s super important to be gentle when folding in the whipped cream. I’ve had my share of over-mixed batches that turned flat instead of fluffy and light. Take your time; the more gently you fold, the better your cheesecake cups will be.
Also, if you can’t find fresh blueberries, don’t stress. Using frozen blueberries can be convenient, but make sure to thaw and drain them properly; otherwise, the excess moisture can turn your dessert into a puddle of mush. It happened to me once, and let me tell you, it wasn’t pretty!
Serving Suggestions
When it comes to serving my No-Bake Blueberry Cheesecake Cups, I love keeping it simple yet elegant. I usually line them up on a colorful platter for a beautiful presentation. Sometimes, I place fresh mint leaves beside each cup for a pop of color—visually appealing and adds a nice aroma too!
If I feel a bit fancy, I’ll drizzle some blueberry compote over the top before serving. It adds a little indulgence and looks absolutely stunning. Plus, the extra burst of blueberry flavor is something my friends absolutely adore!
Finally, these cups are not just for summer gatherings. I’ve made them for birthdays and holiday parties, and they were a huge hit! Any time I’m looking for a light, refreshing dessert, I know this recipe is my go-to choice.
Variations & Customizations
I love experimenting with flavors and textures, so I often customize this recipe! For a chocolate lover’s twist, I’ve utilized chocolate sandwich cookies for the crust instead of traditional graham crackers. You’d be surprised by how delicious chocolate and blueberry taste together!
Sometimes, I like to swap out the blueberries for other fruits as well. Raspberries, strawberries, or even peaches can add a different flavor profile while still working beautifully with the cheesecake component. Just make sure to adjust the sweetness if using tart fruits!
If there’s any dietary restriction to consider, I’ve also made a dairy-free version using almond cream cheese and coconut whipped cream. While the flavor is slightly different, it’s just as creamy and satisfying, so everyone can join the fun!
How to Store, Freeze & Reheat
If you find yourself with leftovers (although that doesn’t happen often in my kitchen!), simply cover them tightly with plastic wrap and store them in the fridge. They keep well for up to three days, but I recommend consuming them sooner for the best flavor and texture.
If you want to make these cups in advance, they freeze exceptionally well too! Just take them out, freeze them until solid, then wrap them individually in plastic wrap and seal them in an airtight container. They can last for up to two months in the freezer. When you crave a treat, simply thaw them in the refrigerator overnight before serving!
Just remember that while they are safe to freeze, the texture of the blueberries might change slightly. They might release some moisture, so a quick re-drizzle of fresh lemon juice could brighten the flavors again when serving!
Conclusion
As I wrap up this recipe, I can’t help but smile at the thought of the delicious memories created in my kitchen with these No-Bake Blueberry Cheesecake Cups. They truly capture the joy of summer in every bite. I hope you give this recipe a try; I promise it will become a cherished favorite just like it has for me. Happy baking—or should I say, happy no-baking!