After incorporating the Oreo crumbs, take a moment to taste the frosting—you can always adjust the sweetness by adding more powdered sugar if it’s not sweet enough for your liking. If it feels too thick to spread, don’t hesitate to drizzle in a little more cream, one tablespoon at a time, until you reach your desired consistency. Now it’s time to use this delightful frosting! You can pipe it onto cupcakes for a lovely presentation or spread it generously onto a cake.
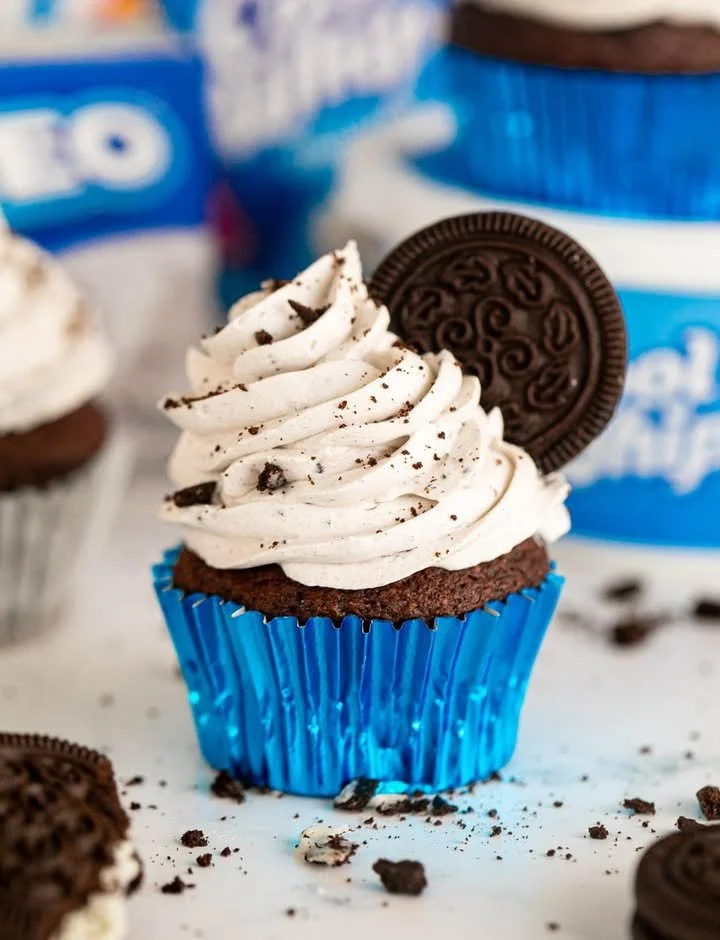
For a truly impressive effect, I love to sprinkle some extra crushed Oreos on top of the frosted desserts. This not only brings visual appeal but also enhances that delicious crunch—trust me, it’s a hit at gatherings! Just be mindful to enjoy it while it’s fresh. I recommend using it within a week for the best taste and texture, though I usually find it disappears much sooner!
Pro Tips for Best Results
I tested this frosting in three ways: with different types of butter, varying the sugar amounts, and even swapping in different kinds of heavy cream. My absolute favorite results came from using unsalted butter at room temperature. It created a creamier texture that really took the Oreo crunch to another level.
Something I learned the hard way is to always crush the Oreos first instead of adding whole cookies to the frosting. I once made the mistake of mixing in cookie halves, which left me with awkward chunks instead of the delightful fusion of cookies and cream I was hoping for.
Finally, don’t forget to store your frosting properly! I’ve noticed that keeping it airtight in the fridge prevents it from forming a crust, ensuring it retains that irresistible smoothness.
Common Mistakes to Avoid
One common mistake I’ve made several times is forgetting to properly soften the butter. If your butter is too cold, you’ll end up with lumps instead of a smooth frosting, which can be frustrating. Always set it out on the counter for about an hour before you start! (See the next page below to continue…)
Another pitfall is overmixing the frosting once you’ve added the Oreos. Trust me, I did this once, and the cookies turned into a mushy paste rather than keeping their delightful texture. Just mix until combined and you’ll have the perfect crunch!
Also, it’s important to stock up on ingredients before starting. There’s nothing worse than being in the midst of making this delicious frosting and discovering you’re out of butter or powdered sugar. Always double-check your pantry before diving in!
Lastly, don’t underestimate the power of a good taste test! I had a batch that tasted marvelous until I added all the Oreos, and it became too crazy sweet. Always adjust to your taste before fully committing to serving it.
Serving Suggestions
Now that you’ve made this delightful Oreo Cookie Frosting, the fun really begins! I love using it on homemade chocolate cupcakes—it creates the perfect cookies-and-cream vibe with every bite. You can also use it atop a classic vanilla or chocolate cake for a fun twist.
For an easy but decadent dessert, try dipping fresh strawberries or pretzels into the frosting! It’s the perfect blend of sweet and salty, and I promise your guests will be begging for more. Even just spreading it on graham crackers turns into a wonderful treat that stands out in any snack lineup.
Lastly, if you have leftover frosting (which is rare in my house!), it’s excellent for filling sandwich cookies or for using as a dip for fruit. Keep it on hand and watch it disappear!
Variations & Customizations
One of the things I love about this frosting is how adaptable it is! If you’re feeling adventurous, you can easily swap in different flavored cookies, like mint Oreo or peanut butter chocolate for a twist on the original. Each variant brings something unique to the frosting while keeping that delightful Oreo base.
Another fun idea is to mix in some mini chocolate chips along with the Oreo crumbs. This adds extra texture and a burst of chocolate that chocolate lovers will adore! You can also experiment with flavors by incorporating a hint of espresso powder for a mocha-flavored version.
If dairy or gluten is a concern, you can create a vegan or gluten-free version by using coconut butter and gluten-free Oreos. I’ve tried both varieties, and they’re just as delicious, proving that everyone can enjoy this delightful frosting!
How to Store, Freeze & Reheat
If you’re not using all the frosting at once, no problem! Just store it in an airtight container in the fridge, where it will stay fresh for about a week. When you’re ready to use it again, just give it a quick stir to bring it back to that fluffy consistency. If it seems too firm, add a splash more cream to loosen it up.
If you want to prepare it ahead of time, you can freeze the frosting in a freezer-safe container or a zip-top bag. It should maintain its quality for up to three months. When it’s time to use it, simply take it out of the freezer the night before and let it thaw in the fridge. Once it’s ready, stir it again to restore its texture.
Reheating isn’t necessary for frosting, but if you notice it’s a bit too stiff after thawing, you can let it sit at room temperature for a little while to soften up before using. No one wants hard frosting on their delicious treats!
Conclusion
There you have it—my beloved Oreo Cookie Frosting recipe! It’s quick, easy, and oh-so-delicious, making it perfect for all of your baking needs. Whether you use it to frost a cake or simply enjoy it by the spoonful, I know you’ll love it just as much as I do. So grab your mixing bowl and make some magic in your kitchen. Can’t wait to hear how it turns out for you!