Next, I gently place the folded Quesarito back into the skillet. I let it cook for about 3-4 minutes on each side or until it’s golden brown and the cheese inside is melty. The aroma of sizzling cheese and warm tortillas fills my kitchen, and it’s simply heavenly. If you’re a cheese lover like me, consider sprinkling additional cheese on the outside of the tortilla as it cooks. Why resist extra cheesiness when you can have it? Once it’s ready, I let it rest for a minute before slicing it in half, revealing that ooey-gooey goodness inside!
Serve it warm, perhaps with a side of homemade salsa or guacamole. Honestly, it’s hard to resist going for seconds, especially when the house smells like a taco joint! You can customize this meal with any of your favorite toppings or sauces, allowing you to crush those cravings without stepping outside.
Pro Tips for Best Results
One pro tip I always use when making Quesaritos is to ensure your tortillas are the right size—too small, and you’ll end up with overflow; too big, and it can be tough to fold! I found that the best size is about 10 inches in diameter. This ensures a perfect fit for all your delicious fillings without a mess.
Another personal trick I’ve learned is to heat your nacho cheese sauce in the microwave just before adding it to your Quesarito. This makes it easier to spread and ensures it’s all melty and gooey when you bite into it—I can guarantee you’ll love the texture!
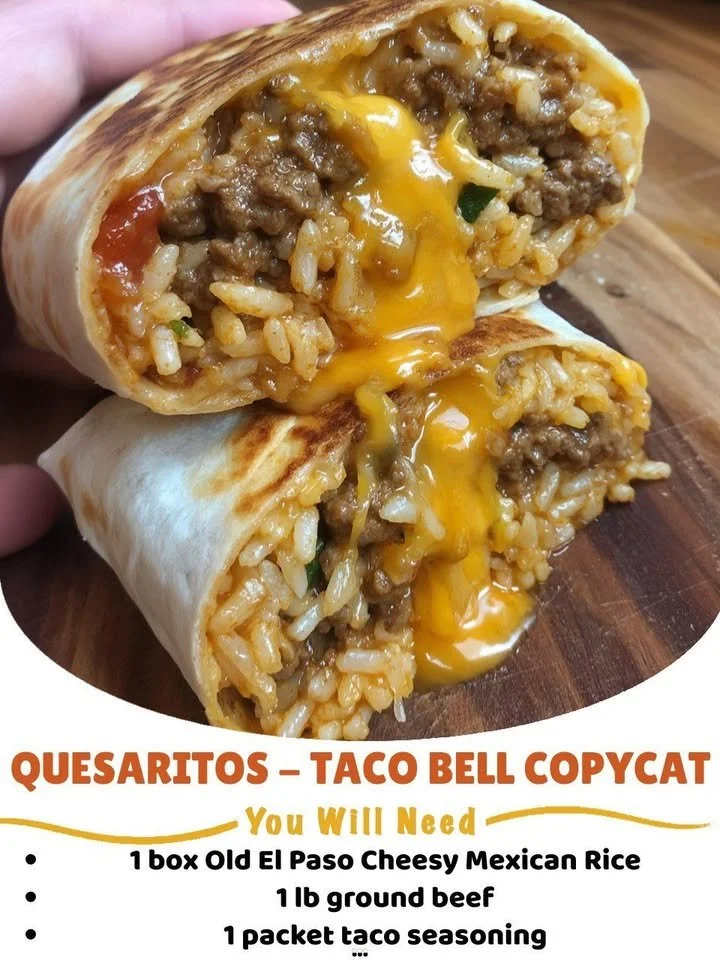
Lastly, I experimented with different cheeses, and I’ve found that a combination of sharp cheddar and pepper jack gives that perfect flavor kick. What can I say? I like it spicy!
Common Mistakes to Avoid
The first common mistake I made early on was not cooking the meat thoroughly before adding it to my Quesarito. Trust me, biting into a raw or undercooked filling is not how you want to enjoy your meal. Always ensure everything is cooked and seasoned just right! (See the next page below to continue…)
Another area where I faltered was overfilling my tortillas. I wanted to cram everything in, but it only resulted in a messy kitchen and a Quesarito that wouldn’t hold together. I recommend being generous but cautious; less is often more in this case.
Also, don’t skip the resting time after cooking. I used to dive right into my Quesarito, only to have all the insides spill out. Allowing it to cool for just a minute helps everything set, giving it that ideal bite.
Lastly, make sure to maintain the heat on your skillet. Too low, and you’ll end up with a soft tortilla instead of that crispy texture we all love. Keep it medium to achieve that perfect golden crust!
Serving Suggestions
I love pairing my Quesaritos with a side of crunchy tortilla chips and guacamole. It creates the perfect balance of textures and flavors—plus, who can resist fresh guac? I also recommend serving them with a fresh salad on the side, especially if you add a squeeze of lime to brighten it all up.
If you want to elevate your meal, consider prepping some homemade salsa or pico de gallo. The freshness complements the richness of the Quesarito beautifully. I like to make mine spicy, incorporating jalapeños for that extra kick!
For something even heartier, why not whip up some refried beans? They make for a hearty side that offers a lovely creaminess and enhances the overall meal experience. You can never have too much good food!
Variations & Customizations
One of the best parts about this Quesarito recipe is how easily it adapts to your cravings! Want to switch it up? Try using grilled chicken instead of ground beef for a lighter option. Or if you’re leaning towards vegetarian, black beans and avocado make a delicious filling.
Another variation I love is adding sautéed veggies, like bell peppers and onions, to the mix. They add color, texture, and loads of flavor. Sometimes, I’ll toss in some spinach or kale for an unexpected green twist!
For those days when I crave something different, I substitute the classic nacho cheese for blue cheese, giving it an entirely new taste profile. A touch of buffalo sauce paired with blue cheese and shredded chicken creates a fun take on the original Quesarito!
How to Store, Freeze & Reheat
If you find yourself with leftovers (which is rare but can happen), storing Quesaritos is simple. Just wrap them tightly in plastic wrap or foil and place them in the fridge for up to three days.
If you want to freeze them, I recommend individually wrapping each Quesarito in foil and then placing them in a zip-top freezer bag. They can be stored in the freezer for up to three months. I love having a batch ready for those lazy evenings when I don’t feel like cooking!
When it’s time to reheat, simply unwrap your Quesarito and use the oven for the best results. Preheat it to 350°F (175°C), place the Quesarito on a baking sheet, and heat for about 15-20 minutes or until it’s warmed through and crispy again! You can also use a microwave, but they won’t get that wonderful crispy crunch.
Conclusion
I hope you give this Quesarito recipe a try in your kitchen! It truly brings that iconic fast food flavor home, and it’s way more fun to customize it as you like. Plus, it’s perfect for sharing (or not!). Whether you’re having a cozy night in or hosting friends, these homemade Quesaritos are bound to impress. Enjoy, and happy cooking!