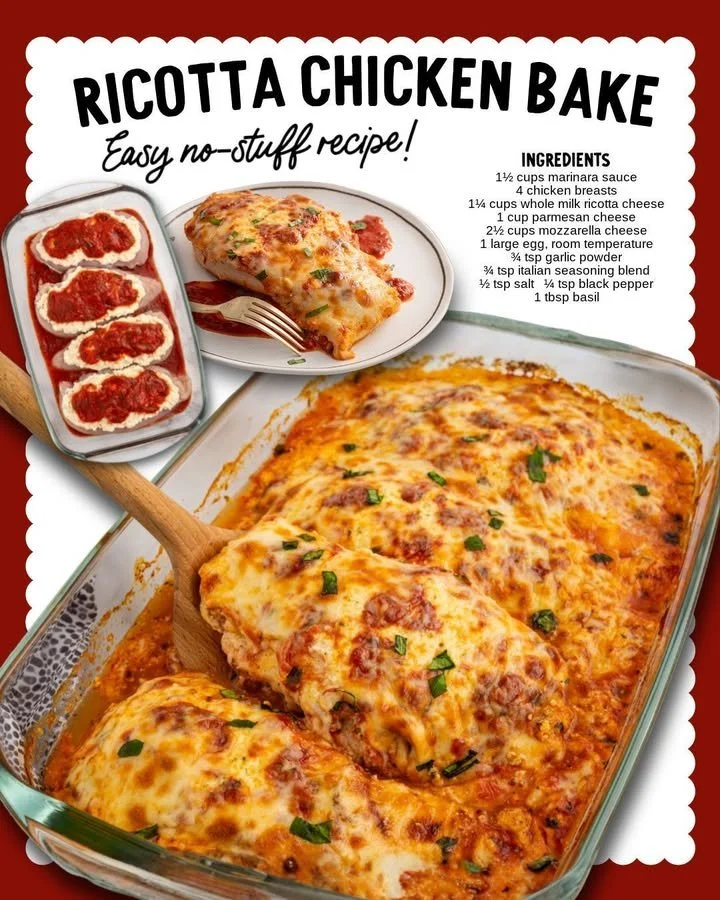
Next, take each chicken breast and gently make a pocket in the side, ensuring you don’t cut all the way through. This is where all the creamy goodness will go! Once the pockets are ready, generously fill each one with the ricotta mixture. Don’t be shy! The filling adds so much flavor, and who wouldn’t want a little extra creaminess?
Now, in an oven-safe skillet, heat the olive oil over medium-high heat. When the oil is shimmering, place the stuffed chicken breasts in the skillet. Sear them for about 3-4 minutes on each side until they have a lovely golden-brown color. This step adds an incredible depth of flavor with that slight crunch on the outside that contrasts beautifully with the creamy filling.
Once seared, transfer the skillet to the preheated oven and bake for about 20-25 minutes or until the chicken is cooked through and reaches 165°F (75°C) internally. The smell wafting through the kitchen will have everyone eager to sit at the dinner table, trust me!
Pro Tips for Best Results
I’ve experimented with this recipe several times, and one key tip I learned is to let the ricotta filling sit for a few minutes after mixing. This really allows the flavors to meld together beautifully!
Also, I found that using fresh spinach gives the dish a lovely texture and vibrant color, but thawed frozen spinach works well in a pinch—just be sure to drain any excess liquid to avoid a watery mixture.
Lastly, don’t skip the searing step! It seals in the juices and enhances the flavor, making your Ricotta Chicken taste like it came from a five-star restaurant.
Common Mistakes to Avoid
One mistake I made the first time I tried this recipe was not sealing the pockets properly. It’s essential to ensure that the filling is well-contained, or it can ooze out during cooking. I recommend using toothpicks to secure the opening if you feel it might burst!
Another thing to watch out for is undercooking the chicken. Always use a meat thermometer to check the internal temperature. It’s a small investment that pays off by ensuring perfectly cooked poultry every time.
I also suggest keeping an eye on the baking time—if your chicken breasts are larger or smaller than average, cooking might take a bit more or less time. Adjust as necessary, and if unsure, always give it a few more minutes rather than cutting into the meat early.
Finally, be cautious with the salt! Since Parmesan is salty itself, I initially added too much salt to the filling and it overwhelmed the dish. Taste as you go, and you’ll find that balance.
Serving Suggestions
This Ricotta Chicken is delicious right out of the oven, but I love serving it with a side of garlic butter pasta or a refreshing arugula salad. The peppery greens contrast so well with the creamy richness of the chicken, refreshing the palate with each bite.
To elevate it even more, I like to drizzle a bit of balsamic glaze over the top before serving. It adds a beautiful sweetness that cuts through the richness, making the dish more complex and flavorful.
And of course, don’t forget a nice glass of white wine to round things off! It’s a casual yet elegant meal that will impress your family and friends alike.
Variations & Customizations
If you’re looking to mix things up, try adding sun-dried tomatoes or roasted red peppers to the ricotta filling. Both options add a delightful sweetness and a hint of acidity that elevate the flavor profile.
For a little heat, incorporating crushed red pepper flakes into the filling is a way to introduce a spicy kick without overwhelming the dish. Just remember to start small—you can always add more, but it’s hard to take it out once it’s in!
Also, for a cleaner alternative, you can try using grilled chicken instead of the seared option. It gives a different flavor and is perfect if you’re aiming for a lighter meal.
How to Store, Freeze & Reheat
Once you make this delicious Ricotta Chicken, you might have some leftovers, which can be stored in an airtight container in your fridge for about 3 days. Just a quick reheat in the microwave or oven, and you’ll have a tasty meal waiting for you!
If you want to prep ahead, this dish freezes wonderfully. After cooking, let the chicken cool, then place it in individual freezer-safe containers. When you’re ready to eat, simply thaw it overnight in the fridge and reheat to your desired temperature.
When reheating from frozen, I recommend using the oven to maintain the crispy texture. Just cover it with foil, so the outside doesn’t brown too much while the inside warms through. Heat at 350°F (175°C) until warmed all the way through.
Conclusion
I hope you’ve enjoyed this little journey into making Ricotta Chicken with me! It’s one of those recipes that warms not just the belly but the heart as well. Whether you share it with loved ones or enjoy it solo, it’s bound to bring a smile to your face. Happy cooking!