Pro Tips for Best Results
I tested browning the beef directly on the sheet pan to be truly one-pan, and while it works, I found it steams more than browns and leaves behind a lot of grease you have to drain. Using a skillet gives you better browning and flavor development, and it only dirties one extra dish that’s easy to clean. It’s worth the swap, I promise. For the crispiest possible tortilla edges, make sure your oven is fully preheated and don’t line the pan. The direct, hot metal contact is what gives you that perfect texture—a lesson I learned after a slightly soggy first attempt with parchment paper.
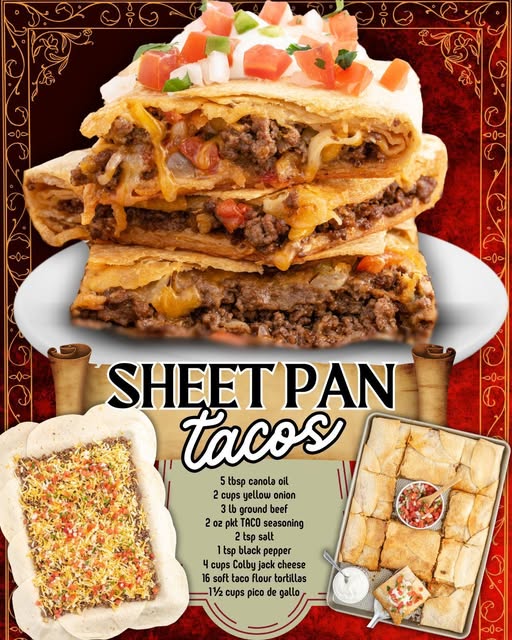
When it comes to the cheese, I’ve tried this three different ways: pre-shredded bagged, a pre-shredded “fiesta blend,” and freshly grated from a block. The block of Colby Jack, grated by hand, was the clear winner. Bagged cheese has anti-caking agents that can hinder meltiness. The fresh-grated cheese melts into a smooth, cohesive, stretchy blanket that adheres to the tortillas beautifully. Take the extra two minutes to grate it yourself; you’ll taste and see the difference.
Common Mistakes to Avoid
My biggest first-time mistake was overcrowding and under-topping. I tried to fit all 16 tortillas flat, which meant they were squished and didn’t form proper cups. Let them overlap slightly! It’s okay. They shrink a bit as they bake. Also, I was shy with the cheese, thinking four cups was too much. It’s not. That generous layer is what holds everything together and creates the best texture. Be bold with your cheese coverage—get it all the way to the edges of the pan.
Another pitfall is skipping the post-oven rest. I was so excited to eat that I started slicing immediately, and it was a cheesy, sliding mess. Letting the pan sit for five minutes allows the melted cheese to firm up just enough so each taco cup holds its shape when you lift it out. It feels like an eternity when you’re hungry, but it’s the secret to a perfect presentation. Patience is a virtue, especially in tacos.
Serving Suggestions
I like serving this right on the sheet pan placed on a trivet in the middle of the table, with bowls of toppings all around. It creates such a fun, interactive, and relaxed meal. For toppings, my non-negotiables are a big bowl of crisp shredded iceberg lettuce for crunch, diced Roma tomatoes (seeds removed so they don’t make things watery), and a generous dollop of cool, tangy sour cream. The temperature contrast is everything.
On the side, I almost always make a quick and easy cilantro-lime rice or a simple pot of simmered black beans. The rice soaks up any delicious cheesy bits left on the plate, and the beans add a creamy, protein-packed element. If I’m feeling extra, I’ll whip up a quick batch of restaurant-style salsa or grab a tub of good guacamole from the store. It turns the meal into a true feast.
For a lighter pairing, a simple side salad with a bright lime vinaigrette cuts through the richness perfectly. And don’t forget the drinks! For the adults, a frosty Mexican lager or a spicy margarita pairs wonderfully. For the kids, a fruity agua fresca makes it feel extra special. It’s all about building that festive, carefree vibe.
Variations & Customizations
The beauty of this recipe is its flexibility. Not a beef fan? I’ve successfully made this with ground turkey (add a touch of olive oil for moisture) and even with a plant-based ground “meat” crumble. The method stays exactly the same. For a “taco pizza” twist, my friend spreads a thin layer of refried beans over the beef before adding the tortillas and cheese—it’s incredible and adds a creamy depth.
You can also play with the tortillas. While flour is my family’s preference for their soft, pliable texture, I’ve used corn tortillas in a pinch. Just note they can become a bit more brittle. For a low-carb version, I once lined the pan with bell pepper strips and sliced zucchini instead of tortillas, piled on the meat and cheese, and baked it. It was a delicious, veggie-packed alternative that scratched the same itch.
The seasoning is your playground, too. Swap the taco packet for fajita seasoning, add a can of drained green chiles to the beef, or mix half cheddar and half pepper jack cheese for a spicy kick. I love adding a rinsed can of black beans to the beef-onion layer for extra fiber. Make it your own! That’s the spirit of taco night.
How to Store, Freeze & Reheat
Leftovers store surprisingly well! Once completely cooled, I transfer individual taco squares to an airtight container. They’ll keep in the fridge for 3-4 days. To reheat, the oven or air fryer is your best friend. I avoid the microwave, as it makes the tortillas chewy and soggy. Instead, I pop them on a baking sheet in a 350°F oven for 8-10 minutes, or in the air fryer at 370°F for 4-5 minutes, until hot and the cheese is melty again. It nearly restores them to their former glory.
Yes, you can freeze these! After baking and cooling, place the squares on a parchment-lined tray and freeze solid, then transfer to a freezer bag. They’ll keep for up to 2 months. Reheat from frozen in a 375°F oven for 15-20 minutes, covering loosely with foil if the cheese browns too quickly. It’s a fantastic way to have a ready-made freezer meal for those desperate nights.
Conclusion
Sheet Pan Tacos have earned a permanent spot in my dinner rotation. They turned a traditionally messy, labor-intensive favorite into a joyful, simple, and utterly delicious one-pan wonder. They’re the recipe I gift to new parents, share with busy friends, and rely on when I need a surefire crowd-pleaser. I hope this recipe brings as much laughter, full bellies, and easy cleanup to your table as it has to mine. Now, go preheat that oven—your new taco night awaits.