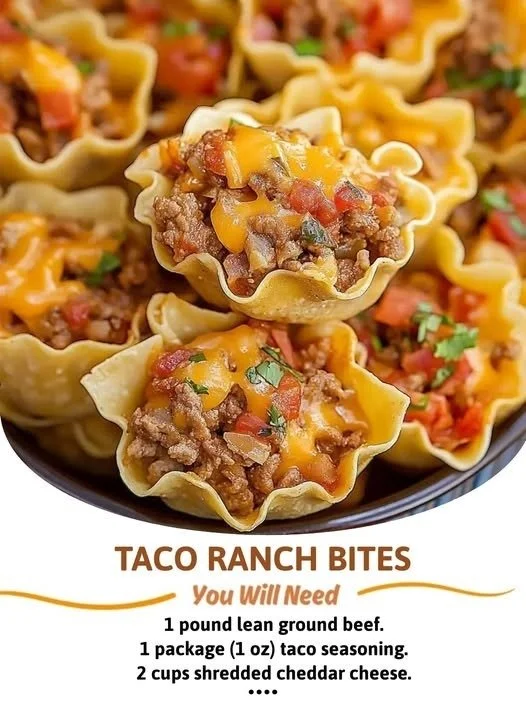
Next, I stir in the shredded cheddar cheese and ranch dressing into the skillet, letting them melt together into a gooey, cheesy mixture. It’s such a delightful mess! Meanwhile, I grab my baking sheet and space out the mini phyllo pastry cups. If using wonton wrappers, I gently press them into a muffin tin to create little cups. Then, I spoon the cheesy beef mixture into each cup. Don’t be shy; fill them up! You want every bite to have that delicious flavor.
Once filled, I sprinkle the crushed tortilla chips on top to give these bites a satisfying crunch. I pop them in the preheated oven for about 15-20 minutes, or until the tops are golden brown and all cheesy goodness is bubbling. It’s one of those moments where your kitchen starts smelling heavenly, and you can hardly wait before diving in!
Pro Tips for Best Results
I tested this recipe three ways, and I found that adding a little bit of diced jalapeños or green chilies to the beef mixture can give it a nice kick for those who enjoy a bit of heat. If you’re not keen on too much spice, feel free to leave them out!
Using good-quality cheese makes a huge difference too. I always opt for freshly shredded cheese rather than the pre-packaged kind. It melts better and adds an extra layer of flavor that you can definitely taste.
Lastly, if you have any left-over filling (which is rare!), you can use it as a dip with tortilla chips. Just warm it up in the microwave, and you’re all set for another snack time!
Common Mistakes to Avoid
One mistake I made when I first tried this recipe was overfilling the cups. While extra filling does sound tempting, it can lead to a messy overflow in the oven. I’ve learned to leave a little space at the top of each cup to prevent that, and it leads to a crispier texture on the edges. (See the next page below to continue…)
Another common pitfall is not preheating the oven properly. If my oven isn’t up to temperature, my bites won’t come out evenly cooked or crispy. So, always make sure your oven is preheated before popping them in; trust me, it’s worth it!
Last, don’t skip out on the crushed tortilla chips topping. That extra crunch is what sets these bites apart, and without it, they may feel incomplete.
Serving Suggestions
These Taco Ranch Bites are perfect served as an appetizer, but I love to make a full meal out of them sometimes! Pair them with a side of fresh guacamole and salsa for a delightful flavor explosion. The coolness of the guacamole complements the warmth and spices of the bites beautifully.
If you’re hosting a party, consider setting up a taco bar alongside these bites. Guests can construct their own mini tacos using the leftovers while mingling with each other—it’s a fun, interactive way to keep the party lively!
Lastly, I like to garnish the finished bites with freshly chopped cilantro before serving. It adds a pop of color and a bright flavor that elevates them even more.
Variations & Customizations
There are so many fun ways to customize these Taco Ranch Bites. One of my favorites is to switch out the beef for shredded chicken or turkey. This provides a delicious but lighter alternative, and you can even use a slow cooker to prepare the chicken beforehand for added convenience.
If you’re feeling adventurous, try adding black beans or corn to the beef mixture for a southwestern twist. It not only adds flavor but also more texture and nutrition!
Lastly, depending on your mood or the dietary preferences of your guests, you can make these bites vegetarian by using crumbled tofu or plant-based meat crumbles. It’s an easy way to make this dish inclusive for everyone!
How to Store, Freeze & Reheat
If you end up with any leftovers (which is rare in my home!), you can easily store them in an airtight container in the fridge for up to three days. Just make sure to let them cool completely before sealing them up to keep them fresh.
For longer storage, you can freeze the Taco Ranch Bites before baking. Simply fill the cups, then place them in the freezer on a baking sheet. Once they are frozen, transfer them to a freezer bag. They can last for up to two months!
When you’re ready to eat, just bake them directly from the freezer—no need to thaw first. Just add a few extra minutes to your baking time to ensure they are warmed all the way through.
Conclusion
I hope you find as much joy in making and sharing these Taco Ranch Bites as I do! They’re not only delicious but also versatile and perfect for any occasion. Plus, the smiles on your friends’ and family’s faces when they take that first bite will make all the effort worthwhile. Enjoy cooking in your kitchen!