Pro Tips for Best Results
My number one pro tip is all about moisture control. After draining the canned fruit, don’t just trust the strainer. I take an extra five minutes to spread the fruit on a triple-layer of paper towels and press firmly with more towels. Any leftover liquid will weep into your salad and make it separate. This small, extra step is the difference between a perfect salad and a soggy one. I learned this the hard way at my first summer cookout, and I’ve never skipped it since.
Another game-changer I discovered after testing this three different ways is to let the base cool before adding the whipped topping, but not to let it start setting. If you refrigerate the base to cool it, it can start to gel unevenly and become lumpy when folded. Room temperature cooling on the counter is the sweet spot. It’s warm enough to still be fluid, but cool enough not to melt your whipped topping.
Finally, don’t skimp on the chilling time. I know it’s tempting to sneak a taste after just an hour or two, but the full four hours (or overnight) is essential for the texture to firm up. It transforms from a loose mousse to a sliceable, scoopable salad. The flavors also deepen and meld together incredibly. I always make mine the night before an event; it’s one less thing to worry about the day of, and it tastes even better.
Common Mistakes to Avoid
The biggest mistake you can make is not draining the fruit well enough. I made this error the first time I tried a similar recipe, and I ended up with a delicious but sadly watery pool at the bottom of my dish by the end of the night. It still tasted great, but it looked messy and lost its fluffy texture. Trust me, take those extra minutes with the paper towels. Your future self, serving a pristine salad, will thank you.
Another common pitfall is substituting ingredients on a whim. I’ve had readers ask if they can use sugar-free gelatin or pudding. While you can, the texture and set will be slightly different and sometimes a bit softer. And as I mentioned, using fresh whipped cream instead of the frozen whipped topping will result in a salad that deflates and gets runny much faster. For this specific, nostalgic potluck staple, the original ingredients listed work together like a perfect science experiment. Stick to the script for the best, most reliable results.
Serving Suggestions
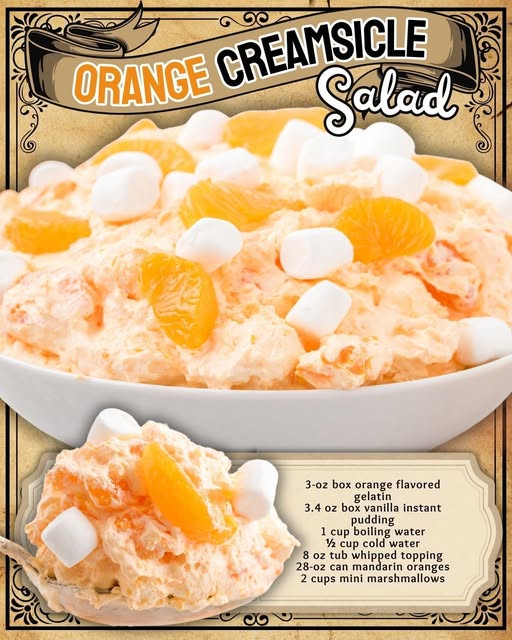
I love serving this salad straight from the bowl with a large serving spoon. It’s gorgeous as-is with the pops of orange and white. For a fancier presentation, you can garnish the top with a few extra mandarin orange segments and a sprinkle of orange zest right before serving. I like to do this when I’m bringing it to a dinner party—it shows you put in that tiny bit of extra love.
This salad truly shines as part of a spread. I always bring it to picnics and barbecues alongside grilled meats, baked beans, and cornbread. The cool, creamy, fruity flavor is the perfect contrast to smoky, savory dishes. It also holds up beautifully on a buffet table for a few hours, which is a major bonus. In the winter, I’ve even served it as a bright, cheerful dessert after a heavy holiday meal—it’s a refreshing palate cleanser.
For a fun individual serving idea, you can spoon it into small mason jars or pretty dessert cups. It’s a hit at baby showers or bridal luncheons served this way. I sometimes add a tiny dollop of extra whipped topping and a single mandarin slice on top of each serving. It makes everyone feel special and makes serving a breeze.
Variations & Customizations
This recipe is wonderfully adaptable! One of my favorite variations is the “Tropical Creamsicle.” I substitute the mandarin oranges with well-drained fruit cocktail, and sometimes I’ll add a half cup of sweetened shredded coconut into the mix. It tastes like a creamy pina colada salad and is always a huge hit. You could even add a handful of chopped maraschino cherries for a pop of color and flavor.
If you’re a fan of more texture, consider adding in a half-cup of chopped pecans or walnuts. I’ll toast them lightly first to bring out their nutty flavor. The crunch against the creamy, soft fruit is fantastic. Another version I’ve seen friends make uses pistachio instant pudding instead of vanilla, combined with the orange gelatin. It creates a beautiful pastel green color and a more complex, nutty-citrus flavor.
For a lower-sugar option, you can absolutely use sugar-free orange gelatin and sugar-free instant vanilla pudding mix. The texture will be nearly identical. You could also swap in a lighter or fat-free whipped topping. I’ve tried it with Greek yogurt before for a tangier, protein-packed twist, but note that it will be denser and less sweet. It’s a great breakfast or snack option when made that way!
How to Store, Freeze & Reheat
Storing this salad is simple. Keep it covered tightly with plastic wrap or in an airtight container in the refrigerator. It stays perfectly fresh and delicious for 3-4 days. The texture might soften slightly by day four, but it’s still utterly edible. I often make it on a Thursday for a weekend gathering. Just give it a gentle stir if any liquid has pooled at the edges before serving.
I do not recommend freezing this salad. I tried it once out of curiosity, and the result was a grainy, separated mess when it thawed. The whipped topping and the gelatin structure don’t hold up well to freezing. This is very much a make-and-eat-within-a-few-days kind of dish. Luckily, it’s so easy and quick to prepare that there’s really no need to make it far in advance anyway. There’s also no need to reheat it—it’s meant to be served chilled and refreshing straight from the fridge.
Conclusion
This Orange Creamsicle Salad is more than just a recipe; it’s a bite of pure, happy nostalgia. It’s the dish that friends and family will ask you to bring to every gathering, and the one that always brings smiles. I hope you love making it and sharing it as much as I do. Give it a try this weekend, and don’t forget to squeeze those fruits dry! Let me know in the comments how your creamy, dreamy creation turns out. Happy cooking