Now, for the cheesecake filling! I grab a large mixing bowl and, using my electric mixer, blend the softened cream cheese and granulated sugar until it’s super smooth and creamy. I then add in the eggs one at a time, blending on low speed to keep things fluffy. Mixing in the vanilla extract is one of my favorite parts because it smells amazing! Once everything is blended together, I gradually add in half of that luscious caramel sauce, mixing until it’s fully incorporated.
Next, I pour the filling over my prepped crust in the springform pan. I smooth it out with my rubber spatula, making sure it’s even. Then it’s time to pop the pan into a preheated oven at 325°F (160°C) for about 50-60 minutes. I usually keep an eye on it, looking for a slight jiggle in the center when I gently shake the pan. When it’s done, I like to let it cool in the oven with the door slightly ajar for about an hour before moving it to the fridge to chill for at least four hours, or overnight if I can wait!
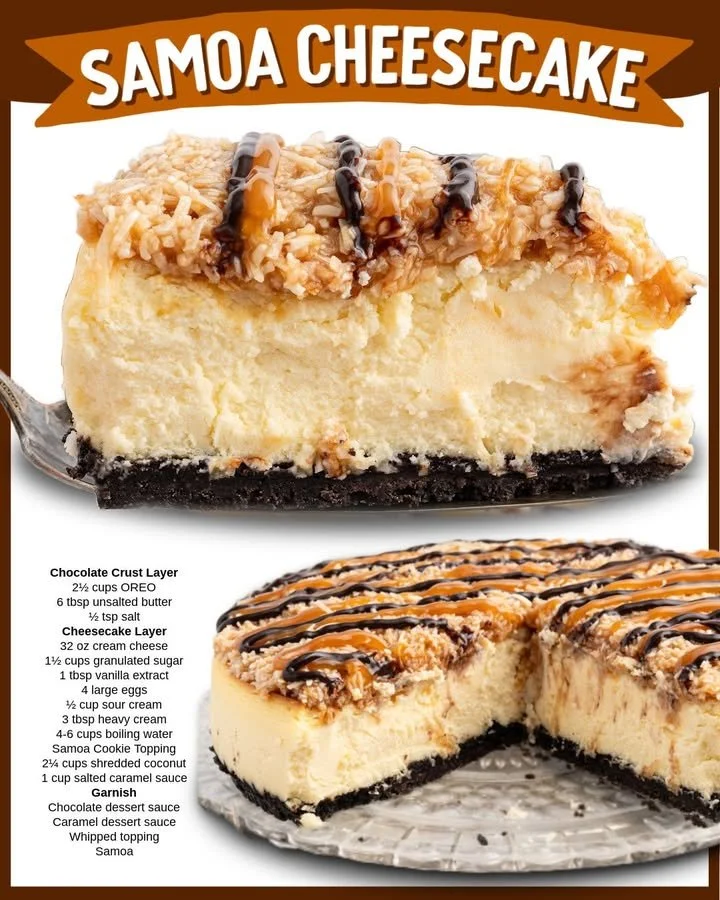
After everything has cooled and set, I take it out of the fridge and drizzle the rest of the caramel sauce on top. I generously sprinkle that toasted coconut and drizzle chocolate sauce over it for a beautiful finish just before serving. The presentation is just as delicious as the taste!
Pro Tips for Best Results
I tested this recipe three different ways, and I found that blending the crust ingredients in a food processor definitely yields the best texture. You really want that fine crumb to hold everything together nicely. If you don’t have a food processor, placing the cookies in a zip-top bag and giving them a good roll with a rolling pin works well too!
One important tip I learned over time is to ensure your cream cheese is at room temperature before mixing it. It makes all the difference in achieving that smooth, creamy consistency. I once tried using cold cream cheese, and let’s just say the lumps were not appealing…
Finally, patience is key when it comes to cooling your cheesecake. Letting it cool gradually in the oven prevents cracks from forming on the top. I always take a little extra time to do this step truly right!
Common Mistakes to Avoid
One mistake I see people make is overbaking the cheesecake. This is so easy to do! You want it to be just slightly jiggly in the center when you take it out of the oven. If it looks completely set, you may be in for some dry cheesecake, and nobody wants that!
Another common blunder is trying to rush the chilling process. I know it’s tempting to taste sooner, but allowing it to set in the fridge is incredibly important. When I skipped this step once in my excitement, the cheesecake was too soft and didn’t hold its shape when sliced.
It’s also crucial to avoid letting water get into your springform pan if you’re using a water bath method. If you do, it can make the crust soggy. Wrapping the bottom of the pan in aluminum foil before filling it is a great precaution.
Lastly, don’t forget to measure your ingredients precisely. Cheesecake is a science, and each ingredient plays a critical role in the final product. Eye-balling it leads to unexpected results, trust me; I’ve been there!
(See the next page below to continue…)