Next, in a separate bowl, I beat the softened cream cheese until it’s smooth and creamy, which makes a world of difference in texture. Gradually add in the powdered sugar and vanilla, beating until fully combined. In another bowl, I whip the heavy cream until stiff peaks form. This step gives that luscious thickness to the cheesecake layer that I love! Gently fold the whipped cream into the cream cheese mixture until well combined, creating a fluffy, cloud-like filling.
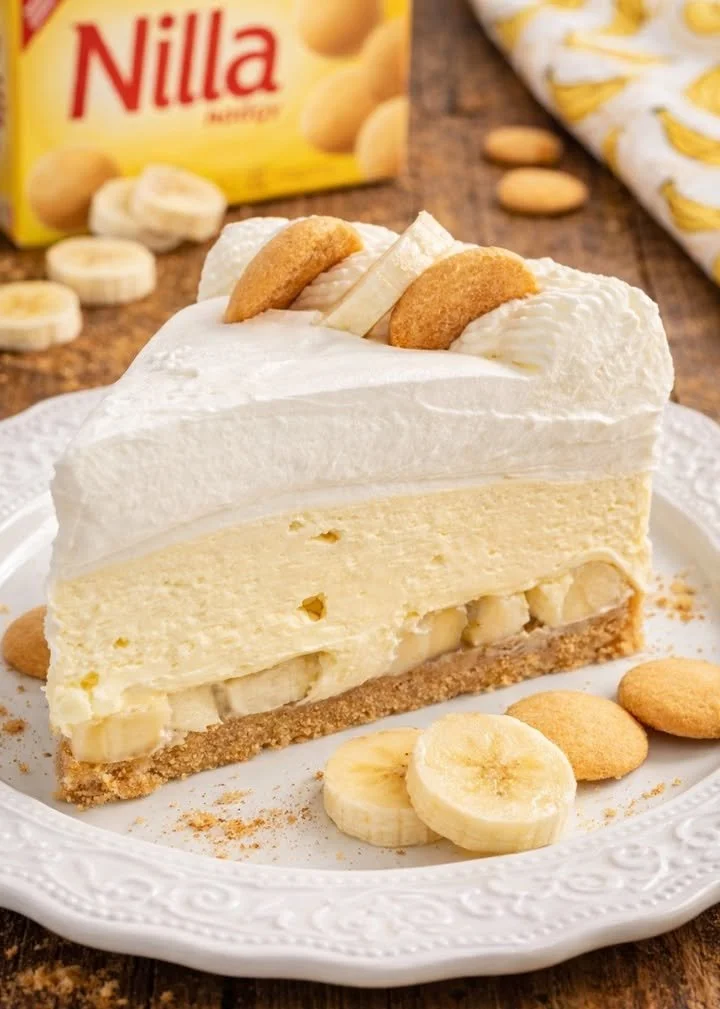
For the pudding layer, I whisk together the instant banana pudding mix with the cold milk until it thickens. Then, I provide each layer with a generous amount of the banana pudding cream, spreading it evenly over the cheesecake layer. For that delightful banana flavor in every bite, I add sliced bananas before layering more cheesecake filling on top. Layering it all ensures a stunning presentation and delicious flavor harmony!
Lastly, I cover the cheesecake with plastic wrap and let it chill in the fridge for at least four hours, or if I can resist, I sometimes leave it overnight. The longer it sits, the better the flavors meld together! When ready to serve, I carefully remove the springform pan and garnish with extra Nilla Wafers. You’ll be amazed at how stunning it looks and smells!
Pro Tips for Best Results
I tested this recipe in several ways, and one of my best tips is to ensure your cream cheese is at room temperature before mixing. If it’s too cold, it may clump and not blend well, leading to a lumpy cheesecake filling. Trust me; I learned this the hard way!
Another tip I recommend is to use ripe bananas. They not only taste sweeter but also impart that incredible banana aroma that makes your cheesecake irresistible. I usually pick bananas that are just starting to develop brown spots—this seems to be the sweet spot for flavor!
Lastly, don’t skip pre-chilling your crust! This simple step helps it set up perfectly and keeps the cheesecake filling stable. I’ve made the mistake of pouring in the filling immediately, and it didn’t hold its shape as well. Now, I always make sure to refrigerate the crust while I prep the filling!
Common Mistakes to Avoid
One mistake I often see when making no-bake cheesecakes is not allowing enough chilling time. I used to rush this process, but believe me, patience is key! If you cut into it too soon, it might ooze out like a puddle instead of holding its beautiful layers.
Another common blunder is not mixing the pudding correctly. If you don’t whisk it long enough with the milk, it can remain runny, and nobody wants that in their cheesecake! I always set a timer for this step to ensure I mix just right.
I also recommend double-checking your measurements before you start. One time, I accidentally used twice the amount of powdered sugar, and the result was an overly sweet cheesecake that just didn’t taste right. Now, I read through the ingredient list twice before diving in!
Finally, watch the bananas! They can brown quickly once sliced. If you’re not planning to serve it immediately, I suggest tossing the banana slices in a little lemon juice to keep them looking fresh and appealing.
Serving Suggestions
When it comes to serving this No Bake Banana Pudding Cheesecake, I love to get a little creative. For an extra touch, I like to drizzle some caramel or chocolate sauce over the top right before serving. It adds a rich contrast to the creamy filling!
I also enjoy pairing this cheesecake with a dollop of whipped cream and maybe a sprig of mint for a pop of color. It elevates the presentation and always gets those “oohs” and “ahhs” from my guests.
Lastly, consider serving it alongside a cup of coffee or tea; the combination is simply heavenly. The creaminess of the cheesecake complements the warm beverage perfectly, making it a delightful end to any meal!
Variations & Customizations
One fun variation I love is adding a layer of peanut butter. Just mix a bit of creamy peanut butter into the cream cheese mixture for a flavor combination that’s simply irresistible. It adds a nutty richness that enhances the overall taste!
If you’re a chocolate lover, consider folding in some mini chocolate chips into the cheesecake filling. The tiny bursts of chocolate with each slice make for a decadent treat that I guarantee will have everyone asking for seconds.
For a lighter twist, you can use Greek yogurt instead of some of the cream cheese. It doesn’t compromise flavor but adds a healthy component. Plus, it brings a nice tang to the dessert that balances the sweetness of the bananas!
How to Store, Freeze & Reheat
Storing your No Bake Banana Pudding Cheesecake is super easy! Just cover it securely with plastic wrap or foil and put it in the fridge where it will stay fresh for up to five days. I often make it ahead of time so it’s ready to go for gatherings and events.
If you want to keep it longer, you can freeze individual slices! Just wrap them in plastic wrap and then place them in an airtight container. They can last in the freezer for about two to three months. When ready to enjoy, simply remove the slices and let them thaw in the fridge overnight.
Reheating isn’t necessary since this is a no-bake cheesecake, but you’ll want to enjoy it cold. I recommend letting it sit out for about 10–15 minutes before serving for the best texture, making it creamy and easy to slice!
Conclusion
I truly hope you give this No Bake Banana Pudding Cheesecake a try. Every time I make it, I’m reminded of warm days and joyful gatherings with family and friends. Its creamy texture and delightful banana flavor never fail to bring smiles all around the table. Happy baking (or rather, no-baking)! Enjoy every delicious bite!