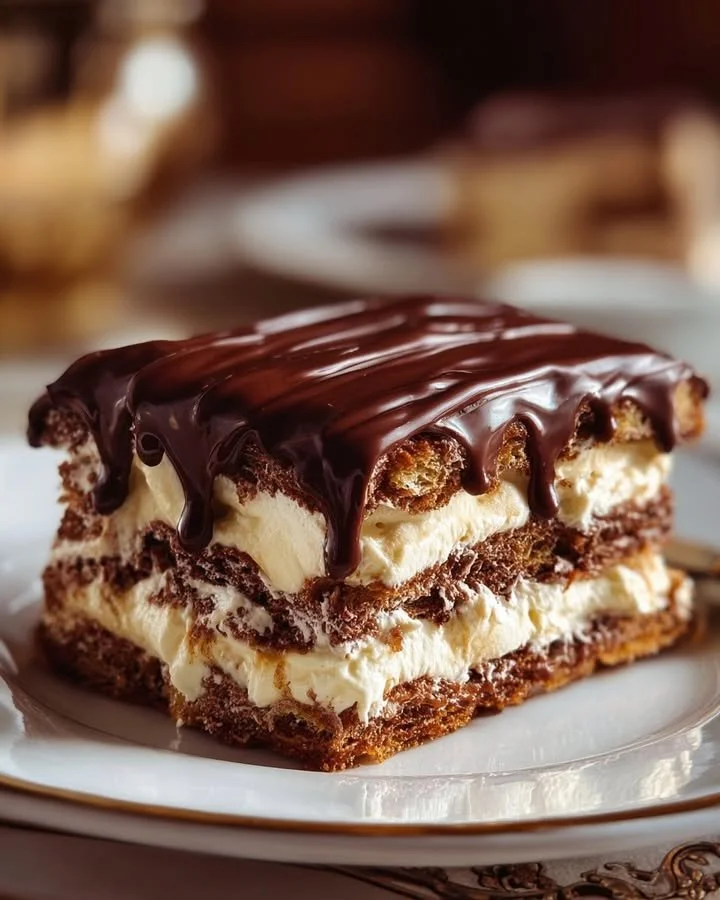
Next, it’s time to layer! Start by placing a single layer of graham cracker sheets at the bottom of your 9×13 inch baking dish. Pour half of the pudding mixture over the crackers, making sure to spread it evenly. Repeat the layers by adding another layer of graham crackers followed by the remaining pudding mix. This layering creates that classic éclair look and will give you a lovely texture with every bite.
Now comes the topping! In a microwave-safe bowl, combine the chocolate chips, butter, and 2 tablespoons of milk. Heat it in the microwave for about 30 seconds, then stir until smooth. This glossy chocolate glaze will create a beautiful finish. Pour the melted chocolate over the top layer of pudding, spreading it to cover the cake completely. Once assembled, you’ll want to refrigerate your masterpiece for at least 4 hours, or overnight for the best texture.
Pro Tips for Best Results
I tested this recipe three ways—using whole milk, almond milk, and even coconut milk. My absolute favorite was the whole milk, as it created a richer, creamier filling. However, if you’re looking for a lighter option, the almond milk worked wonderfully too! Just make sure you’re using a good quality instant pudding mix for the best results. The taste and texture are critical.
Don’t skip the refrigeration step! I can’t emphasize enough how important it is to give this cake time to set. When you let it chill, the graham crackers soften up and absorb some of that delightful pudding flavor, making each bite melt in your mouth. Trust me, waiting is worth every second!
Lastly, use a rubber spatula when spreading the pudding. I learned that the spatula helps glide the pudding mixture over the layers without disturbing the graham crackers. It makes for a much prettier cake and keeps the layers intact!
Common Mistakes to Avoid
One of the most common mistakes I initially made was not letting the cake chill long enough. The first time I served it after only a couple of hours in the fridge, the layers hadn’t set properly, and the cake fell apart. Make sure to give it a good 4 hours, or even better, overnight. Your patience will be rewarded!
Another pitfall is overmixing the whipped topping with the pudding. When I first started, I was too eager and whisked it too much. The mixture turned grainy, which affected the creaminess we all crave in this cake. Just gently fold it in until mixed and leave some fluffy texture—this is key for that delightful mouthfeel!
Lastly, don’t skimp on the chocolate topping! The chocolate glaze adds not just flavor but also a luscious finish that enhances the whole dish. When I thought I could get away with using less, I realized it made a significant difference in the overall taste and appearance of the cake.
Serving Suggestions
When it comes time to serve this delightful cake, I love to garnish each slice with a dollop of whipped cream and a sprinkle of chocolate shavings or fresh fruit. Strawberries or raspberries give it a beautiful pop of color and a refreshing contrast to the rich chocolate. It’s the little touches that make serving feel special!
This No-Bake Chocolate Éclair Cake is perfect for potlucks, family gatherings, or just a cozy night in with a movie. I often love to pair it with a cup of coffee or a scoop of vanilla ice cream on the side. The combination is pure bliss, and I always recommend this duo to friends!
If you’re feeling adventurous, consider drizzling some caramel sauce over the top before serving for an extra layer of flavor. The sweet, gooey caramel pairs so well with the chocolate and vanilla, making every bite even more indulgent.
Variations & Customizations
While I love the classic combination of chocolate and vanilla, I’ve also experimented with variations that bring their own twist to this dessert. One favorite of mine is making a mocha version by adding a tablespoon of instant coffee granules to the pudding mix. It adds a lovely coffee flavor that pairs wonderfully with chocolate!
For those searching for a fruity touch, try layering in some fresh bananas or strawberries between the pudding layers. It adds a delicious contrast and can brighten up the flavor profile. I once made a strawberry variation, and it was such a hit at a summer gathering that I’ve added it to my go-to recipes!
Finally, for a spiced version, consider mixing in a bit of cinnamon or nutmeg with the pudding. It gives a warm, cozy feel that’s perfect for fall gatherings. I added just a hint once, and it turned this cake into a delightful seasonal treat that had everyone coming back for seconds!
How to Store, Freeze & Reheat
To store any leftovers (if there are any!), simply cover the cake tightly with plastic wrap or aluminum foil and keep it in the refrigerator. It will last about 3-4 days, and I find that the flavor often improves as it sits, absorbing all those delicious layers together.
If you want to prepare it ahead of time, you can make it a day or two in advance. Just make sure to store it properly in the fridge so that it stays fresh. I love being able to have this cake ready to go for gatherings; it’s so nice not to be rushed when hosting!
While I haven’t had luck freezing this cake, I suspect the texture of the graham crackers will change once thawed. If you are set on freezing leftovers, I recommend taking out the slices and freezing them individually. Just let them defrost in the fridge before enjoying them again!
Conclusion
I hope you enjoy making this No-Bake Chocolate Éclair Cake as much as I do. It’s a simple dessert that always impresses and brings smiles to everyone’s faces. Whether it’s a summer BBQ or a cozy family dinner, this cake is sure to become a new favorite in your kitchen. Happy baking (or rather, no-baking) and enjoy every sweet bite!